• |

    Practice slump checklist

    Sometimes my students complain that they have had bad practicing days or weeks. Not that I have ever had this problem (ahem), but here are a few ideas for breaking out of a practicing slump.

    photo, Katy Wrathall
    photo, Katy Wrathall
    1. Check equipment. Slightly-malfunctioning gear can make you feel like a bad player. Be sure to eliminate this possibility.
      • Are your reeds functioning well? Prioritize response-balanced-with-stability over more subjective and malleable things like tone. Many reed players use unnecessarily stiff reeds; consider trying something a little softer if you haven’t lately.
      • Is your instrument functioning well? If you know how, check the most important adjustment screws (oboe: left hand stack, left G-sharp key, F resonance; saxophone: bis, G-sharp, right hand stack). Re-check basics like alignment of bridge keys. And, of course, make sure your instrument gets regular (at least annual) maintenance checkups. Professional instruments should probably get full mechanical overhauls every 5-10 years.
      • Are you using the best equipment for you? Don’t let new purchases be your go-to solution for every problem, but in some cases replacing an instrument or accessory can remove a roadblock to progress. (Do a reality-check with your teacher to make sure you aren’t just throwing away money chasing a quick fix.)
    2. Check technique. It might be you after all.
      • Have you warmed up thoroughly and correctly today? It’s best to do this at the beginning of your practice session, but there’s no rule that says you can’t warm up some more mid-session to double-check your tone production and reset your mental focus.
      • Have you reviewed all your fundamentals? Take a closer look at your posture, hand position, breath support, embouchure, voicing, finger movement, etc. Have you slipped back into a bad habit? Are you suffering the effects of a technique deficiency you know you should fix but haven’t gotten around to yet? If you don’t know how to fix it, check in with your teacher.
      • Can you release some tension? Frustration often goes hand-in-hand with tense muscles. Consider doing a little deep breathing, stretching, mindfulness practice, yoga, Alexander Technique, or whatever else puts your body back in balance.
      • Have you laid sufficient technical groundwork? If you are working on something especially difficult, is there something else you could practice as an intermediate step? Études, technical exercises, or other preparatory material can help bridge the gap between your current ability level and the ability level you need.
    3. Check your health. If your body isn’t responding well, your practice sessions will be difficult and unpleasant.
      • Have you been getting enough quality sleep? Implementing good sleep habits is a major upgrade to the function of your mind and body.
      • Are you eating balanced meals? Are you eating enough? Are you eating too much? Is your diet too low on good stuff and/or too high in bad stuff?
      • Are you getting outside for at least a few minutes of sunshine and “fresh” air? Sunshine is important to your body’s vitamin D level.
      • Are you stressed, or otherwise not at your best mentally? In some cases, professional counseling and/or treatment may be needed. If you are a college student, there is a good chance there are free, discreet counseling services available on your campus. In other cases, taking a break, getting a little exercise, talking something out with a friend or loved one, or just getting a change of scenery might be enough.
    4. Check your mindset.
      • Are you practicing mindlessly or without direction? Try making a short list of goals you would like to accomplish during this practice session. If you’re not sure where to start, make a quick recording (perhaps with the voice memo app on your smartphone) and listen to it to get some ideas about what needs improvement. If you don’t meet all your goals, you can tackle them again tomorrow or re-prioritize.
    5. Check your environment.
      • At what time of day are your practice sessions the most productive and pleasant? Do you practice best in the morning before your body is tired and your brain is full? Or do you get a second wind after the sun goes down?
      • What locations are most conducive to good practice sessions? Sometimes just changing the scenery can revitalize your focus and productivity. Practicing in places with different acoustical qualities can make you hear yourself in new ways and get your creative juices flowing.
      • What distractions are getting in your way? Can you reduce or remove them?
    6. Check your ego. Practicing should challenge you, but not overwhelm you.
      • Are you working on music that is inappropriately difficult for your current abilities? If you have some freedom to choose what you practice, consider working on something else for now and tackling this project later. If you are committed to a performance of something very difficult and have to make it work, be sure to include other things in your practice session that you can be successful at, to keep your motivation primed.

    Don’t let poor practice sessions bring you down—use them to refine your habits and make the next session your best yet.

  • Favorite blog posts, January 2016

    Some nice work from woodwind bloggers in January:

    Don’t see your favorite blog here? (Your own, perhaps?) Make sure I know about it.

  • Creating fingering charts with diagrams from the Fingering Diagram Builder

    My Fingering Diagram Builder has been around for a little over five years now. I was careful to name it the Fingering Diagram Builder instead of the Fingering Chart Builder because it is a tool for creating individual diagrams, not for assembling them into comprehensive fingering charts. But the difference can be a little confusing, so I get frequent questions from users who complain that they can’t figure out how to create and download a “chart” with multiple fingerings on it.

    The reason I didn’t try to build a complete system for creating fingering charts is that I assumed users would have widely-varying needs, and would do better to assemble charts using some other kind of software. Here are a few examples of how that might be done, using music notation software, using a word processor, and using a text editor to create HTML code (such as for a website). All the software I’m using here is free to download on Windows, Mac OS, and Linux, but whatever free or commercial programs you are already using probably have similar features. You’re on your own to work out the details (and feel free to share them in the comments if you are feeling helpful).

    Creating a fingering chart in music notation software

    I am using MuseScore here, but commercial software like Finale and Sibelius and other free software like LilyPond could be used in similar ways.

    First I set up a musical “score” with the notes for the chart. I used whole notes, separated by double bar lines, but that’s up to you.

    MuseScore setup

    Next I created my fingering diagrams in the FDB. I sized the diagrams “tiny” with “thick” lines.

    Adding the diagrams to the score is very simple in MuseScore—I just dragged the downloaded diagrams from my file manager right onto the score. If I drag the diagram and hover it on top of a note, that note gets highlighted. Then I can release the diagram and it attaches to the note.

    musescore-drop

    Initially the diagrams are placed right on top of the note. I selected the diagrams and used the Inspector panel to give them a horizontal offset of -2.5sp and a vertical offset of -10.5 sp, which moved them above the staff, more or less centered above the noteheads. I adjusted the A and tenor B-flat fingerings’ horizontal offsets a bit more to make them look just right.

    Here is the finished product, a small chart with a few bassoon fingerings:

    bassoon-fingering-chart-sample

    Creating a fingering chart in word processing software

    I am using LibreOffice Writer, but something like Microsoft Word or Apple Pages would work just as well.

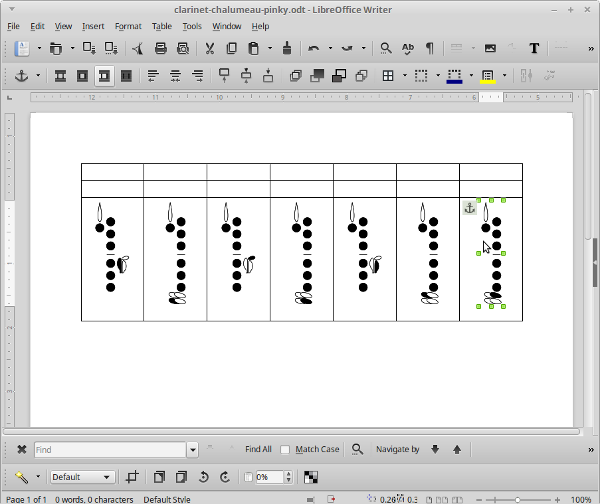
    First I opened a new document and inserted a table. My table has three rows and seven columns.
    writer-table

    Then I dragged the downloaded diagrams from my file manager into the bottom row of the table.

    writer-diagrams

    I merged some cells together, dragged in some images of notes on staves, and added some text.

    writer-complete

    A few more little tweaks and here is the finished chart:

    clarinet-fingering-chart-sample

    Creating an HTML fingering chart in text editing software

    This code be used in any text editor or HTML source editor, and of course similar results could be accomplished with a visual/WYSIWYG editor. I’m not showing complete code here, just the most relevant parts.

    I started with a framework for a table that I could use to show a note with two alternate fingerings. (This is a flute fingering chart with horizontally-oriented diagrams. For an instrument with vertically-oriented diagrams, you may want to rearrange things a bit.)

    <table>
      <tr>
        <th rowspan=2><!— note image here —></th>
        <td><!— first fingering image here —></td>
        <td><!— first fingering text here —></td>
      </tr>
      <tr>
        <td><!— second fingering image here —></td>
        <td><!— second fingering text here —></td>
      </tr>
    </table>
    

    Then I plugged in <img> tags and text:

    <table>
      <tr>
        <th rowspan=2><img src="images/f-sharp-note.png" /></th>
        <td><img src="images/f-sharp-standard.png"</td>
        <td>Standard</td>
      </tr>
      <tr>
        <td><img src="images/f-sharp-trill.png"</td>
        <td>Trill from E</td>
      </tr>
    </table>

    I duplicated that code for additional notes. Since this is a sample alternate/trill fingering chart, each note has at least two fingerings. For notes with more fingerings, I added <tr>s and changed the rowspan values accordingly.

    I also added a little CSS to spruce things up:

    <style>
      table {
        display: inline-block; /* make tables wrap gracefully depending on screen width */
        margin: 1em; /* put some space between tables for legibility/clarity */
      }
      th img {
        max-width: 8em; /* manage size of note images */
      }
    </style>

    Here is the result:

    flute-fingering-chart-sample

    I hope that sparks a few ideas for you if you are considering putting together a fingering chart. If you have other methods or tips, please share in the comments section!

  • Endurance and breath support

    Physical endurance can be an issue for woodwind players, most often manifesting as fatigue in the muscles of the embouchure. But I think in most cases tired facial muscles are a symptom of a more fundamental problem.

    The muscles used for forming woodwind embouchures are small and finely-tuned for precise movements, such as in speech and in facial expressions. This also makes them well-suited to the fine control needed for woodwind playing. But those muscles are not really adapted to feats of strength or endurance.

    photo, Denise Coronel
    photo, Denise Coronel

    Tired and sore embouchure muscles lead to additional problems, such as compensation by clamping down with the larger, stronger jaw muscles, which sacrifices control and causes woodwind players (especially reed players) to bite into their own lips. (As a less-experienced player, I thought of those raw, swollen, and eventually calloused spots in my lips as signs of dedication to practicing. I don’t have those spots any more. In many cases, the need for some kind of cushion or dental appliance over the teeth when playing is a sign of unnecessary biting.)

    Woodwind players should be doing most of their physical “work” with muscles that have strength and stamina. The “core” muscles of the torso have both: they are an integral part of posture, balance, and virtually all gross motor activities (walking, jumping, lifting, sitting, standing, and many more). The core muscles are also the muscles of breath support, which is arguably the most crucial, foundational aspect of woodwind playing.

    Powerful breath support takes a huge burden off the facial muscles. For example, it stabilizes pitch, reducing the need to “lip” notes up or down (which is a less-effective technique anyway); it strengthens and solidifies tone, reducing the tendency to “control” the tone (poorly) by biting or squeezing with the lips; and it eases response, reducing tension. Weak breath support leads to biting and pinching with the embouchure, and that tension spreads throughout the body.

    When you start to feel your embouchure muscles start to tire, allow your face to relax, and focus instead on powerful abdominal breath support.

  • Practicing and the two-minute rule

    David Allen’s well-known book Getting Things Done is always within arm’s reach at my desk. I find its concepts and techniques valuable for managing my time and productivity.

    I don’t consciously use a lot of “GTD” ideas in my practicing, since practicing seems to me like a thing that is never “done.” (If any of you are applying GTD concepts to practicing, I’m interested in hearing about it.) But there’s one part of the GTD system that I do think of often when practicing or working with students: the “two-minute” rule.

    photo, Matthew
    photo, Matthew

    The idea is this: when organizing your tasks, if something comes up that will take less than two minutes to complete, it’s better to go ahead and do it rather than taking the time to process it into your to-do list and revisit it again later.

    I try especially to impress this on students who are stuck in “stage one” practicing, running long passages or entire pieces without stopping to isolate and fix problem spots. If you are practicing, here are some examples of things to spend two minutes or less solving now, rather than adding them to a do-later list:

    • Look up an unfamiliar foreign term
    • Mark in a missed key-signature note or ensemble cue
    • Practice an awkward three- or four-note passage (How many times can you practice it in two minutes? One or two hundred times?)
    • Check and adjust the tuning of a problem note
    • Revisit a favorite tone exercise to improve the sound of a certain note or passage
    • Figure out and mark in a trill fingering
    • Make and notate an interpretive decision (You can always change your mind later. For now, pick a plan and try it out rather than leaving it up in the air.)
    • Choose and mark a good place to breathe
    • Settle a question or conflict by consulting the full score or accompaniment part
    • Make a quick recording (your smartphone probably has a voice-recording app) and identify some areas to focus on (and possibly solve in two minutes)

    This approach does sometimes mean breaking stride on larger practice-time projects, but in general I find the two-minute fixes to be worthwhile.

  • 2015 in review

    Here are some of the things that went on here at your favorite woodwind blog during the past year.

    If you have read anything interesting or useful here during the past year, I hope you will consider leaving a comment, getting in touch via email or social media, buying a shirt or sending a donation, contacting me aboutadvertising opportunities for your relevant business, and/or pointing your all your woodwind friends toward bretpimentel.com.

    Thanks for reading in 2015, and best wishes for the new year!

  • Favorite blog posts, December 2015

    I am pleased once again to share some excellent woodwind-related blog posts from the past month, and especially to point you toward some bloggers appearing here for the first time. Enjoy!

  • Pedagogical recipes

    I want to follow up on something I touched on in my last post. I described in that post how I had my woodwind methods class evaluate some online pedagogical resources, and mentioned that I had them compare the information found online to the information presented in class. My idea was to prepare them to deal with conflicting information, which will be part of their reality as public school band directors.

    Woodwind pedagogy, unfortunately, is a mishmash of contradictory ideas. This is supported by a culture of hero worship of certain teachers and performers, a permissive editorial process for publishing pedagogical materials (increasingly so with the rise of the internet), and an attitude that music is not subject to scientific method.

    When conflicts exist between one school of thought and another, in some cases that is because one or both sides is incorrect. In other cases the problem is a communication failure: both sides are applying the same techniques in the same way, but describing them poorly (or at least differently). But I think there are other cases where the difference can be attributed to what I think of as different “recipes.”

    photo, Sarah Horrigan
    photo, Sarah Horrigan

    There are many ways to make a chocolate cake. Some cake recipes might be objectively better than others by some measure or another. Some might produce results that are generally satisfactory but especially suited to certain tastes. And in some cases, two different recipes might produce results that are very similar. In those cases, the way the ingredients and techniques balance is significant: one recipe might call for two eggs instead of three, but has more of another ingredient that makes up the difference, or a difference in baking time and temperature.

    I think a similar thing can happen with “recipes” for woodwind playing. Equipment preferences are a fairly clear example: one clarinet teacher might favor very stiff reeds, while another prefers softer ones. Both might produce excellent results, so long as they are balanced properly—the first teacher probably balances stiffer reeds against mouthpieces with a more closed tip, and the other might use softer reeds with more open mouthpieces. One oboe teacher might clip his reeds to 70mm while another clips hers to 69.5mm, but they probably balance this with narrower or wider shaper tips, or tweaks to any of a dozen other variables.

    Playing techniques are a little more abstract and complicated to separate out, but I think the same concept applies. One bassoon teacher might encourage some jaw movement when articulating lower notes, while another teaches a more stable embouchure, but it’s always more complicated than that: the technique’s usefulness and effectiveness has to be evaluated in the context of each teacher’s approach to breath support, voicing, embouchure, equipment, and more.

    The idea that I wanted to bring across to my class is that, for band directors or other musicians and music educators who might not be specialists in each of the woodwind instruments, it is important to beware little pedagogical proverbs taken out of context. Something like “firm up your embouchure” or “use a stiffer reed” or “use the alternate F-sharp” can seem like a quick and digestible solution, but can’t be applied casually and without understanding of the larger picture.

  • Student-selected online woodwind pedagogy articles

    If you are teaching a woodwind methods course, you might be interested in my book.

    In the past I have had my woodwind methods classes make woodwind pedagogy notebooks. The idea is to have them explore some available pedagogical resources, and assemble them into a resource they can use for reference in their future teaching. But that assignment is starting to feel a little weird, especially since I have been trying to go increasingly paperless in my own life, and because it has been increasingly difficult to persuade my digitally-oriented students to go to the actual library and look at actual books.

    To be clear, I’m a lover of libraries, and for me there’s no question that there are tremendously valuable resources there that are not available online (yet?). But it seemed like time to experiment with embracing an online approach to the assignment. So during the past semester I had them each locate some online articles they thought might be useful. Then they used a discussion board to collaborate on vetting the articles for usefulness and author credentials, and to compare their content against the concepts we covered in class.

    I’m going to provide here a heavily-edited report of their results with my own commentary. Some articles were proposed but were rejected by classmates as less useful or credible, and I don’t see any need to list those. Also, I wanted my students to go through the process of vetting online information, but I didn’t entirely agree with their conclusions, so I’m omitting some that I personally think are problematic. (If you’re wondering, my own blog posts were off-limits.)

    photo, Knight Foundation
    photo, Knight Foundation

    Here are some of the articles my students voted to be worthy of inclusion in a digital notebook:

    • Clarinet Basics: Maintenance Habits, written by Julie DeRoche for The Woodwind and The Brasswind. This one was very highly regarded by the class, and I am inclined to agree with their assessment. My students liked the article’s thoroughness and day-to-day applicability. Two cautions with this article: firstly, I think it’s wise to be careful with (paid?) articles from websites that want to sell you things, but Ms. DeRoche’s credentials are above reproach and the information checks out. Secondly, the article does describe briefly the process of oiling a clarinet’s bore, though it does not strongly recommend this procedure. That is probably information best not given to beginners—at that stage it should be prescribed and carried out by a professional.
    • Reed Help for Beginners, written by Sarah Hamilton. This oboe-related article was another top pick by the class, who appreciated its down-to-earth advice, clearly-explained concepts, and helpful illustrations. I agree that this is a great resource, though some of the reed evaluation and adjustment procedures described might be beyond the scope of what a non-oboist band director can or should attempt.
    • Beginner Clarinet Tips, written by “Andrea.” This one is really more of a table of contents to some other articles on the site. My class liked the breadth of material covered and the extensive photos. I find the information to be very similar to much of the conventional wisdom regarding beginning clarinet playing, which mostly but not completely agrees with my preferred approaches.
    • The Big Switch, by Amanda King. My students found this advice on switching students to the bassoon to be useful. I am on record as disagreeing with the premise that beginners should start on some other instrument before switching to the one they want, but the article does raise some relevant points for cases where that is happening.
    • Teaching the Beginning Bassoonist, written by Terry Ewell for The Double Reed. I’m including this excellent article even though it really is geared toward private bassoon teachers rather than band directors; it’s a good example of solid information that would be mismatched to this particular audience. It’s also a good (and relatively harmless) demonstration of the importance of using up-to-date materials, as bassoon reeds now cost well over $6 USD.
    • Tips for Teaching Beginning Flute Players written originally for BandWorld Magazine by Randy Navarre. My students liked the article’s concision and clarity. I generally agree with the information presented.

    I think some good things came out of the assignment, though I still feel like I sold out a little by excusing my students from visiting the library. I stayed fairly hands-off through the discussion process, and that did result in the students selecting some articles that weren’t really a fit for what I wanted them to learn. In the future I might consider being more involved with guiding the discussion. I’m also concerned that the final product—this blog post—isn’t as tangible as an actual notebook, and might not be as ready at hand, but hopefully they have developed some skills in evaluating information they find online.

  • Favorite blog posts, November 2015

    Lots of interesting woodwind blog posts this month. Here are some favorites: