New and significantly improved contrabassoon diagram. Thanks to several of you who contributed with keywork photos and other feedback. I haven’t had recent access to a contrabassoon myself, so if you’re a contra player and see things that need tweaking, please let me know. The old contrabassoon diagram is still available as a key set of the bassoon diagram (now called “Contrabassoon (old),” and the new one is its own separate entry (“Contrabassoon”). I’ll keep an eye on the server logs and if it looks like the old one is still getting a lot of use I’ll keep it around.
Half-holes on the Fingering Diagram Builder aren’t a new feature, but I get lots of questions about how to do them, so here are some instructions I can refer people to.
Easiest way
If you’re making diagrams for flute, (French) clarinet, (German) bassoon, or recorder, and you don’t need anything especially complicated, you can open the “Keywork details” menu and click the option to turn “Half-holes” to “Upper,” “Lower,” or “Off.” For flute the options are a little different, to allow for half-holing in four directions.
Once your desired half-holes are enabled, you can hover your mouse over the keys (or look for the grey outlines on a touchscreen device) to see them. Click/tap on the desired half of the hole to “close” it, or again to re-open it. The “open” ones will not appear in your downloaded image.
clarinet
bassoon
recorder
upper
lower
flute
Lengthwise upper
Lengthwise lower
Widthwise proximal
Widthwise distal
More complicated but flexible way
If you need to turn on only certain half-holes, or mix upper with lower, etc., you will have to roll up your sleeves a bit more. Open the “Keywork details” menu and look for the top-level “Half-holes” heading. Organized beneath this you will see all the available half-holes, organized into groups like “Lower half holes.” I suggest adjusting the settings as follows:
“Half-holes” = Always
Each subgroup containing a desired half-hole, such as “Lower half holes” = Always
Each desired individual half-hole = “As needed”
Each undesired individual half-hole = “Never”
That will make the desired half-holes visible when you “close” them, and invisible otherwise.
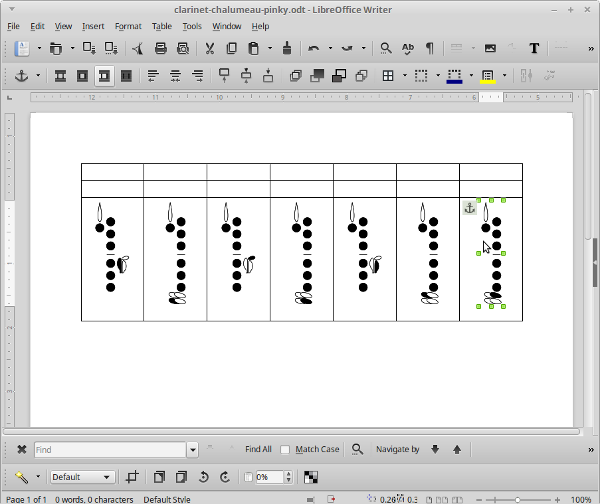
In the following example, I have set the clarinet’s left hand first finger upper hole and the left hand third finger lower hole as described.
If you anticipate using a certain half-hole configuration frequently, you can save it for future use. Set the half-holes (and other keywork) up how you want it, open the “Keywork details” menu, and look near the bottom of it for the “Custom key sets” submenu. Open that, type a name for your current set of keys, and click/tap “Add.”
The French bassoon diagram now supports the Ducasse bassoon. Set “Instrument” to “Bassoon (French)” and “Key set” to “Ducasse.” Thanks to Daryn Zubke for assistance with this.
New bassoon keys: High F (plus offset high E and E-flat), alternate low C, alternate low C-sharp. This should cover everything Fox currently lists as bassoon keywork options. (Thanks to Trent for the feedback.)
The most recent release of the Fingering Diagram Builder introduces some “shortcut” controls that make it easy to turn certain keys on and off. For example, with a quick check/un-check of a box you can turn on clarinet half-holes or some non-standard keys.
Or, as always, there’s a dropdown list of “key sets” (which I referred to as “presets” in previous FDB versions) to turn on and off the right keys for a complete instrument variant.
“Bass clarinet, pro,” for example, turns on (among other things) the right thumb keys down to low C found on many professional bass clarinets. “Standard Boehm” turns them off.
All of these menu controls work by changing the behavior of the keys present in the instrument diagram. The behavior of each key, or group of keys, can be set to “Always,” “Never,” or “As needed.”
If you have a specific set of keys in mind, you can set the behavior of each key directly. Let’s say I have a fancy new oboe with a left-hand “long” C-sharp key and a left thumb low B key, and I want to make a fingering chart to map out some of the new fingering possibilities. (There’s currently an easy check-box for the left C-sharp, but we’ll ignore that for now to explore the hands-on method.)
I’ll start with the thumb B key. If I open the “Keywork details” section of the menu, and then the “More keywork details” section, I see a long list, partially pictured here.
The last key in the picture is the key I want to use in my fingering chart. Before we go on, notice that its name is aligned all the way to the left, meaning that it is a stand-alone key, not part of a group of keys. A little above it you can see the name “Thumb octave keys,” with four keys below it and indented. “Thumb octave keys” is a group, and the keys listed below it (“First octave key,” etc.) are in that group.
Okay. “Left thumb low B” is currently set to “Never,” which is pretty self-explanatory: the key simply never appears in the diagram.
Setting it to “Always” is also clear enough: the key will be visible all the time, pressed or not. If I set it to “Always” and don’t press any of the oboe keys, here’s what the diagram looks like:
Visible in this image are the six “main” keys, with a little horizontal line visually separating the left hand from the right hand, plus the thumb low B key. All of these are now set to “Always.” The other keys—the octave keys, the little finger keys, etc., are not visible. This particular layout is probably not what I want. Some people like every available key (including the octave keys, etc.) to be visible in every image, but I prefer and recommend showing only the most relevant ones for the particular fingering. The left low B will only be relevant for a specific note or two.
So let’s set that key to “as needed” instead. Since this key isn’t part of a larger group, its “as needed” behavior is easy to understand. When it’s pressed, it appears in the image. When it’s not, it doesn’t. I will still be able to see where the key is while I’m using the FDB, because it will appear in gray outline when I hover over the diagram with my mouse or trackpad, or appear constantly if I’m using a touch device, but it won’t be part of the downloaded image.
If I set it to “As needed” and hover my mouse pointer over the diagram in the FDB, I see this, with the left low B present:
And if I download the image, I see this:
Now let’s turn to the left C-sharp key. Since it is part of a group (“Left little finger keys”) its behavior is a little more complex. Here’s what the group’s behavior settings look like for the “Conservatory” key set:
Several of the keys are set to “Always,” and several are set to “Never.” But the group itself is set to “As needed.” Here’s how that works: if none of those keys is pressed, the FDB determines the group is not “needed,” so none of the keys are visible. But if any of the “Always” keys is pressed, the FDB considers the group needed and makes it visible, including all the “Always” keys within it. (The “Never” keys are still not visible.) So, for example, if I press the “Left E-flat,” I get this:
Only the left E-flat is pressed, but the other keys in the group appear too, to give a little visual context.
So, to make the left C-sharp available, I will set it to “Always.” But when an oboe has a left C-sharp, the left F-key usually gets moved over a little and has a little different shape. So I’m also going to set “Left F” to “Never,” and “Left F (with low C-sharp),” a key designed for this situation, to “Always.” Now I have this (low C-sharp in red, altered left F in yellow):
By setting the behavior of individual keys, you can do just about any combination of keys you can think of. And you can use the “Custom key sets” menu to save your settings for future use.
This system also makes it relatively easy for me to add obscure or unusual keys to the diagrams, and keep them hidden except when people need them for specific purposes. So, if there are keys you would like to have in your images, and you didn’t find them in the “More keywork details” list, let me know and I’ll consider adding them in future versions. It’s extra-helpful if you can send good photos.
One thing I wanted to do in this release is give something back to the very generous and sexy people who have been kind enough to use the PayPal donation link to show their support over the years, so I’ve added some special exclusive features for donors. Most of those features are geared toward those doing large or involved projects, such as for publication.
To be clear, none of the old features have been put behind a paywall, and with this release and future releases I’ll keep working on improvements for the free users, too. And you can get the donors-only features with a one-time donation of literally any amount of your choice. (If you’ve donated before, you can try the “Are you a previous donor?” link to activate your special features, but you might have to email me so I can fix it for you manually, especially if your donation was a few years ago.)
Anyway, here’s what’s new:
Some weird/cool new key sets like Kingma-system flutes, the Redgate oboe, and the Contraforte. I’m flying a little blind on those since I don’t exactly have those instruments laying around, so if you’re an expert let me know what tweaks are needed.
Downloads in .gif format (in addition to the previously-available .png and .tif). For some purposes .gifs won’t look as nice as .pngs, but the file sizes are very compact, which is useful in some situations. And for donors, you can also download in .svg format, which gives you basically unlimited scalability with no loss of image quality. .Png and .svg downloads also now get lossless compression, which you can turn off if for some reason you want to.
Diagrams can be rotated 90° in either direction. Donors can also mirror them, which I think is a strange idea but lots of people have requested it.
Image backgrounds can be white (like before), or now also transparent.
Some more flexibility for donors: finer control of image size and line thickness, and an editable color palette. Donors also have some new options for how images are cropped.
You can still, as before, let the FDB automatically provide unique filenames for your downloaded images or name each one manually. But now you can also type placeholders: %i to auto-insert the name of the current instrument, %k for the key set, and %c for an auto-incrementing counter. It’s hard to explain, but try it out and I think you’ll see it’s pretty easy and useful.
In addition to downloading images to your device or uploading to Dropbox, you can also post them to Imgur. That gives you quick-and-easy shareability of images on all the social media sites, and you don’t need to create an account or anything.
People have been rightfully baffled for years by the powerful but undocumented “Keywork details” thing. That hasn’t gone away, but many of the instruments now have a more user-friendly interface for turning certain keys on or off. I hope to add to and refine these interfaces in response to the continuing frustrated emails. It has also become abundantly clear that, while I’ve tried to make everything as intuitive as possible, it’s time for a help page.
The FDB can, if you like, remember the fingering you were working on in a previous session. (This feature is turned off by default.) I don’t expect that many people need multiple visits to the FDB to complete one fingering diagram, but it’s handy if, say, you accidentally navigate away.
Once again, a thorough visual refresh and lots of little interface tweaks.
This one is boring but important: basically a ground-up rebuild of the FDB’s guts, using smarter coding than I knew how to do nearly nine years ago when I first released it. (For the code-savvy, I’ve replaced my spaghetti jQuery code with slightly-less-pasta-like Vue.js code.) That will hopefully help keep it running reliably and maintainably on modern web browsers for the better part of another decade.
Please do check it out, and send me your bug reports and other feedback.
My Fingering Diagram Builder has been around for a little over five years now. I was careful to name it the Fingering Diagram Builder instead of the Fingering Chart Builder because it is a tool for creating individual diagrams, not for assembling them into comprehensive fingering charts. But the difference can be a little confusing, so I get frequent questions from users who complain that they can’t figure out how to create and download a “chart” with multiple fingerings on it.
The reason I didn’t try to build a complete system for creating fingering charts is that I assumed users would have widely-varying needs, and would do better to assemble charts using some other kind of software. Here are a few examples of how that might be done, using music notation software, using a word processor, and using a text editor to create HTML code (such as for a website). All the software I’m using here is free to download on Windows, Mac OS, and Linux, but whatever free or commercial programs you are already using probably have similar features. You’re on your own to work out the details (and feel free to share them in the comments if you are feeling helpful).
Creating a fingering chart in music notation software
I am using MuseScore here, but commercial software like Finale and Sibelius and other free software like LilyPond could be used in similar ways.
First I set up a musical “score” with the notes for the chart. I used whole notes, separated by double bar lines, but that’s up to you.
Next I created my fingering diagrams in the FDB. I sized the diagrams “tiny” with “thick” lines.
Adding the diagrams to the score is very simple in MuseScore—I just dragged the downloaded diagrams from my file manager right onto the score. If I drag the diagram and hover it on top of a note, that note gets highlighted. Then I can release the diagram and it attaches to the note.
Initially the diagrams are placed right on top of the note. I selected the diagrams and used the Inspector panel to give them a horizontal offset of -2.5sp and a vertical offset of -10.5 sp, which moved them above the staff, more or less centered above the noteheads. I adjusted the A and tenor B-flat fingerings’ horizontal offsets a bit more to make them look just right.
Here is the finished product, a small chart with a few bassoon fingerings:
Creating a fingering chart in word processing software
A few more little tweaks and here is the finished chart:
Creating an HTML fingering chart in text editing software
This code be used in any text editor or HTML source editor, and of course similar results could be accomplished with a visual/WYSIWYG editor. I’m not showing complete code here, just the most relevant parts.
I started with a framework for a table that I could use to show a note with two alternate fingerings. (This is a flute fingering chart with horizontally-oriented diagrams. For an instrument with vertically-oriented diagrams, you may want to rearrange things a bit.)
<table>
  <tr>
    <th rowspan=2><!— note image here —></th>
    <td><!— first fingering image here —></td>
    <td><!— first fingering text here —></td>
  </tr>
  <tr>
    <td><!— second fingering image here —></td>
    <td><!— second fingering text here —></td>
  </tr>
</table>
I duplicated that code for additional notes. Since this is a sample alternate/trill fingering chart, each note has at least two fingerings. For notes with more fingerings, I added <tr>s and changed the rowspan values accordingly.
I also added a little CSS to spruce things up:
<style>
  table {
    display: inline-block; /* make tables wrap gracefully depending on screen width */
    margin: 1em; /* put some space between tables for legibility/clarity */
  }
  th img {
    max-width: 8em; /* manage size of note images */
  }
</style>
Here is the result:
I hope that sparks a few ideas for you if you are considering putting together a fingering chart. If you have other methods or tips, please share in the comments section!
I have released version 0.7 of the Fingering Diagram Builder. Mostly it supports some new instruments. Let me know if you run into bugs or have suggestions or feature requests.
Here’s what’s new:
I fixed a bug that was preventing saving custom presets. Not sure if anybody noticed.
Viennese oboe diagrams.
German clarinet diagrams, in Oehler and Albert variants.
French bassoon diagrams, in Jancourt and modern Buffet variants.
The (Conservatory) oboe diagram now (optionally) has a thumb low B key.
The (German/Heckel) bassoon diagram now (optionally) has an offset C-sharp trill (hat tip to Trent Jacobs).
European woodwindy goodness. L-R: Viennese oboe, Oehler clarinet, Buffet bassoon
Note that I do not play or own a Viennese oboe, an Oehler- or Albert-system clarinet, or a French bassoon, nor am I suitably fluent in European languages to 100% understand the related pedagogical literature, so I could really use some assistance on making sure these new diagrams look right and things are named properly. Please don’t hesitate to get in touch if you have suggestions/improvements.
As always, I’m glad to hear from folks who are using the FDB, and to see the cool things you are making (websites, blog posts, books, posters, handouts…). The FDB generates thousands of images every month, which I think is pretty cool.
I have just released version 0.6 of the Fingering Diagram Builder. It’s almost a maintenance release, that mostly just attempts to fix a few problems and add a little polish. Your suggestions and bug reports are, as always, welcome (as are your donations, social media pings, links, etc.). Go play around with it or read on for the details.
New hotness
Here’s what’s new:
The user interface got a minor facelift and some usability improvements. For example, if you dare to use the “Keywork details” tab, you may notice that the menu stays a little more manageable size-wise, and if you’re working at a desktop monitor you can tweak things without losing sight of the diagram.
Several of you wrote in to point out that the Dropbox functionality had become broken. Dropbox changed some things on their end and I got a little behind on making the necessary adjustments on my end. Long story short, the FDB now uses Dropbox’s slick little popup thing if you want to save your fingering diagrams there. You might have to enable popups for the FDB in your browser. Also, if you’re not using Dropbox yet, how do you even survive?
Valved brass instrument diagrams have been around since version 0.2, but they were little-known because for some reason I lumped them in with the simple-system flutes. I know. They are much easier to find now. You can stop writing in to ask if I know of a website that does diagrams for brass instruments.
If you are into creating custom styles, you can now include your selected instrument as part of those if you wish.
The Creative Commons license has been updated to version 4.0. That really just means that some of the legalese underlying it has changed. You’re still totally free to use the diagrams for your not-for-profit projects, or to hit me up and make the necessary arrangements if you want to use the diagrams to make something you’re going to sell. (Here’s a cool example of something made with literally one bazillion FDB diagrams: it’s a book.)
I did a bunch of other stuff under the hood to improve stability and speed and to lay groundwork for future improvements.
As always, there are more improvements in the works. I usually wait until I have more of a “wow” feature to show off before doing a release, but I wanted to get a fix out there for the Dropbox users. Enjoy!


