Creating fingering charts with diagrams from the Fingering Diagram Builder

My Fingering Diagram Builder has been around for a little over five years now. I was careful to name it the Fingering Diagram Builder instead of the Fingering Chart Builder because it is a tool for creating individual diagrams, not for assembling them into comprehensive fingering charts. But the difference can be a little confusing, so I get frequent questions from users who complain that they can’t figure out how to create and download a “chart” with multiple fingerings on it.

The reason I didn’t try to build a complete system for creating fingering charts is that I assumed users would have widely-varying needs, and would do better to assemble charts using some other kind of software. Here are a few examples of how that might be done, using music notation software, using a word processor, and using a text editor to create HTML code (such as for a website). All the software I’m using here is free to download on Windows, Mac OS, and Linux, but whatever free or commercial programs you are already using probably have similar features. You’re on your own to work out the details (and feel free to share them in the comments if you are feeling helpful).

Creating a fingering chart in music notation software

I am using MuseScore here, but commercial software like Finale and Sibelius and other free software like LilyPond could be used in similar ways.

First I set up a musical “score” with the notes for the chart. I used whole notes, separated by double bar lines, but that’s up to you.

MuseScore setup

Next I created my fingering diagrams in the FDB. I sized the diagrams “tiny” with “thick” lines.

Adding the diagrams to the score is very simple in MuseScore—I just dragged the downloaded diagrams from my file manager right onto the score. If I drag the diagram and hover it on top of a note, that note gets highlighted. Then I can release the diagram and it attaches to the note.

musescore-drop

Initially the diagrams are placed right on top of the note. I selected the diagrams and used the Inspector panel to give them a horizontal offset of -2.5sp and a vertical offset of -10.5 sp, which moved them above the staff, more or less centered above the noteheads. I adjusted the A and tenor B-flat fingerings’ horizontal offsets a bit more to make them look just right.

Here is the finished product, a small chart with a few bassoon fingerings:

bassoon-fingering-chart-sample

Creating a fingering chart in word processing software

I am using LibreOffice Writer, but something like Microsoft Word or Apple Pages would work just as well.

First I opened a new document and inserted a table. My table has three rows and seven columns.
writer-table

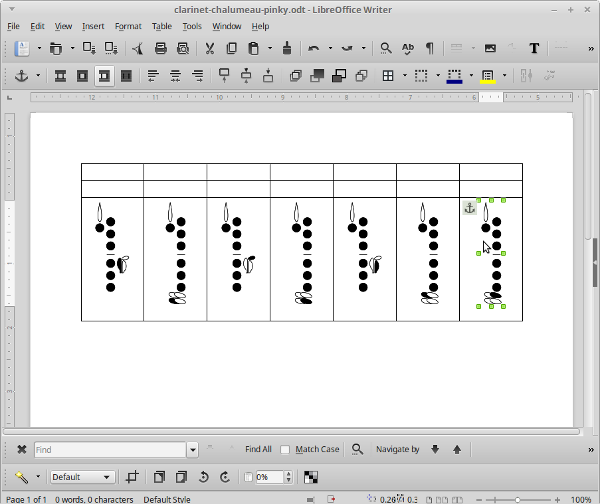
Then I dragged the downloaded diagrams from my file manager into the bottom row of the table.

writer-diagrams

I merged some cells together, dragged in some images of notes on staves, and added some text.

writer-complete

A few more little tweaks and here is the finished chart:

clarinet-fingering-chart-sample

Creating an HTML fingering chart in text editing software

This code be used in any text editor or HTML source editor, and of course similar results could be accomplished with a visual/WYSIWYG editor. I’m not showing complete code here, just the most relevant parts.

I started with a framework for a table that I could use to show a note with two alternate fingerings. (This is a flute fingering chart with horizontally-oriented diagrams. For an instrument with vertically-oriented diagrams, you may want to rearrange things a bit.)

<table>
  <tr>
    <th rowspan=2><!— note image here —></th>
    <td><!— first fingering image here —></td>
    <td><!— first fingering text here —></td>
  </tr>
  <tr>
    <td><!— second fingering image here —></td>
    <td><!— second fingering text here —></td>
  </tr>
</table>

Then I plugged in <img> tags and text:

<table>
  <tr>
    <th rowspan=2><img src="images/f-sharp-note.png" /></th>
    <td><img src="images/f-sharp-standard.png"</td>
    <td>Standard</td>
  </tr>
  <tr>
    <td><img src="images/f-sharp-trill.png"</td>
    <td>Trill from E</td>
  </tr>
</table>

I duplicated that code for additional notes. Since this is a sample alternate/trill fingering chart, each note has at least two fingerings. For notes with more fingerings, I added <tr>s and changed the rowspan values accordingly.

I also added a little CSS to spruce things up:

<style>
  table {
    display: inline-block; /* make tables wrap gracefully depending on screen width */
    margin: 1em; /* put some space between tables for legibility/clarity */
  }
  th img {
    max-width: 8em; /* manage size of note images */
  }
</style>

Here is the result:

flute-fingering-chart-sample

I hope that sparks a few ideas for you if you are considering putting together a fingering chart. If you have other methods or tips, please share in the comments section!

Similar Posts

  • Saxophone hand position

    I often see poor hand position among developing saxophonists. It’s not as much of a problem for oboists, clarinetists, or bassoonists, since those instruments’ finger holes demand a higher degree of finger-placement precision in order to close them properly; an open-holed flute also requires a little more care. But the saxophone’s toneholes are all covered by pads affixed to relatively large keys, so even with a casual approach to hand position getting the holes covered isn’t a serious problem.

    But there are a number of advantages to more careful hand positioning, and on a well-designed instrument it’s also really easy: just put the tips of the three middle fingers of each hand on the corresponding key touchpieces. (Not the tippy-tips, like a violinist, with the fingers perpendicular to the key surface, but the fleshy pad or “pulp” of the finger, just to the palm side of the tippy-tip.)

    Let’s look at the left hand first. I have superimposed (poorly) the key touches over my fingers to show their locations.

    Good hand position
    Good hand position
    Poor hand position
    Poor hand position

    Here are the problems that the poor hand position causes:

    • In order to fully depress the keys, the fingers may lock straight or even collapse backwards a bit. This makes the fingers’ motion more complicated and tense, and less efficient.
    • The fingers may contact the keys farther down the finger pad, perhaps even at or below the first knuckle crease. This decreases control over the keys. And/or…
    • The pads of the fingers contact the keys somewhere beyond the key touchpieces, giving the fingers less leverage and requiring more effort to depress the keys.
    • The pinky finger is shifted to a position where it is more difficult to reach the low C-sharp key, and where more effort is required to fully depress it.
    • Although not pictured here, the thumb should also be situated to that its pad contacts the octave key in a strong position with good leverage.

    Now the right hand.

    Good hand position
    Good hand position
    Poor hand position
    Poor hand position

    If poor right hand position is used:

    • As with the left hand, the fingers lose their neutral curve and become unnecessarily straightened.
    • As with the left hand, the contact points between the fingers and keys are less than optimal.
    • The pinky finger is shifted into a position where either the finger must be contorted to contact the E-flat key properly, or a less-optimal part of the finger contacts the key.
    • The ring finger must bend uncomfortably to reach the side F-sharp key, or that key must be pressed by stiffening the finger and contacting the key near the base of the finger, which is imprecise and awkward.
    • Sometimes poor right-hand position results from allowing the crook of the thumb and index finger to sit in the thumb hook. In these cases, good hand position will require repositioning the thumb so that the thumb’s distal joint is in the thumb hook.

    Some of my students, when asked to shift their hand position, have initially objected, insisting that their poor hand position is required due to their individual anatomy or the configuration of their individual saxophones. I have yet to see this prove true. I suppose I can’t eliminate the possibility that very rare situations exist that might call for a slight adjustment to the finger-pads-on-the-touchpieces positioning, but I haven’t encountered a significant case of this yet. Even with my larger-than-average hands (you may be able to spot my custom extra-high green palm key touchpieces in the photos), putting my fingertips on the touchpieces immediately creates an open, relaxed, and efficient hand position, with fast finger movement and a light touch on the keys. If your saxophone has badly-positioned touchpieces, you might consider visiting a good repair technician to have them relocated (or consider it a warning sign of a poorly-made instrument that should be replaced).

    Good hand position is a prerequisite to smooth, effortless saxophone technique. Check yours carefully, and set yourself up for success.

  • |

    Need a panflute? Woodwind doubling gear woes

    Toothpaste For Dinner

    A handy “panflute flowchart” from toothpastefordinner.com. Read More “Need a panflute? Woodwind doubling gear woes”

  • Switching between saxophones

    If you are an alto saxophone player and pick up a tenor or baritone for the first time, it’s pretty common to have a thin, weak tone, to be on the sharp side, to struggle with low note response, and to have issues like the top-of-the-staff G and G-sharp squeaking.

    If you are a tenor player having your first alto experience, or an alto or tenor player newly picking up soprano, you might find that your tone is tubby, your pitch unstable and tending toward flatness, and your palm key notes unreliable.

    There are a couple of key things to check as you make the switch from one saxophone to another:

    1. How much mouthpiece you are taking in. I like this trick as a starting point for finding the correct position: gently insert a piece of paper between the mouthpiece and reed. The point where the paper stops is approximately the place where your lip should contact the reed.
    2. Voicing. The best way to check this on saxophones is by playing a note on the mouthpiece alone. These are the concert pitches you should produce: If you aren’t producing these pitches, adjust by blowing warmer air to lower the pitch, or cooler air to raise it. Don’t adjust by biting or by shifting the mouthpiece in your embouchure. (It takes some practice.)

    Getting mouthpiece position and voicing right for each saxophone helps you achieve good tone, pitch, and response no matter which you are playing. If you are actively playing multiple saxophones, check both of these things on each instrument as part of your daily warmup, and then follow up with overtone exercises and full-range scales and arpeggios. On a gig, I find it helpful to be conscious of mouthpiece position and voicing as I put one saxophone down and pick up another.

    Happy practicing!

  • “More air”

    When I use the term “breath support,” students and colleagues often echo back something like “oh, right, more air.” But is breath support the same thing as “more air?”

    Measuring quantities of air isn’t completely straightforward—when we say “more air,” we might rightfully wonder whether that means a greater volume filled with air, or a greater number of air molecules, or whether we’re really thinking of something like airflow or air velocity.

    For my purposes in teaching, I find a few different measures to be relevant:

    First, you must set up breath support with a good inhalation, and I think it’s generally helpful to inhale a large volume of air into the lungs.

    Then, you must pressurize the air by engaging the torso muscles, constricting the space in which the air is contained. (The diaphragm’s relaxation alone does create pressure, but not enough for good woodwind playing.)

    The increased pressure makes the air escape your embouchure at a higher velocity. You can adjust the size of your embouchure, allowing more or less air to pass through, which is the basic mechanism woodwind players use to change (sound) volume (or “dynamics”).

    I’m most directly concerned with air pressure when I talk about breath support, and in some ways in which that does translate to “more” air. But since “more” can be measured in multiple ways, I like to use a more exact term like “breath support.” That also has the concreteness of referring to something that the player actively does, rather than focusing the imagery on air, which is invisible.

    Be precise in your pedagogical vocabulary, and consistent in your breath support.

  • Buying woodwind instruments

    General advice

    The information on this page is intended for beginning and intermediate players, including woodwind doublers who already play another instrument. Here are some rules of thumb:

    • Get the advice of a good teacher, preferably one that doesn’t get a sales commission from a music store. It’s okay to ask advice before starting lessons. A good teacher wants you to have a good, working instrument.
    • In fact, be very skeptical of anything you are told by music store salespeople. My students frequently begin lessons with poor, non-working woodwind instruments that were highly recommended by the guitar player working behind the counter. Ask the salesperson to demonstrate the instrument. If they can’t do it, there’s little reason to take their recommendations.
    • The most important consideration for a beginner’s instrument is its condition. Woodwind instruments use pads made of leather, skin, or cork that MUST seal properly. Poorly adjusted instruments are one of the top causes of frustration in beginning players. Don’t waste your time fighting with a leaking instrument. Cosmetic flaws like worn or scratched finish or small dents (except in vital spots such as a flute’s headjoint or saxophone’s neck) do not necessarily affect an instrument’s playability, but may be warning signs of larger problems. It is possible to buy a non-working instrument and have a good technician restore it to playable condition, but it would be a good idea to get their appraisal of the instrument before you buy it.
    • Don’t buy musical instruments from department stores, megastores, or warehouse stores. These temptingly cheap instruments are made from inferior materials and are almost always in poor adjustment. Good repair shops won’t even work on them because they tend to break under the normal strains of routine maintenance.

    Read More “Buying woodwind instruments”

  • Voicing for multiphonics

    Disclosure: As an Amazon Associate I earn from qualifying purchases, at no cost to you.

    One of my favorite tips for producing woodwind multiphonics comes from J. Michael Leonard’s Extended Technique for the Saxophone. (Mine is an older edition, I think.) The book’s section on multiphonics gives two pages of instruction and and a one-page fingering chart with diagrams like this:

    The “aha” moment I got from this was the small arrows, which the author says “indicate a relative primary focusing of the airstream.” To me this sounds like what I call voicing. The idea is that each of these multiphonics has a sort of key note within its chord, and if you focus/voice to favor that note, the multiphonic will speak.

    Readers of this blog know I don’t like voicing gymnastics, at least for conventional playing technique. It’s better to find the optimal voicing for the instrument and keep it steady. Change it only when the acoustical quirks of the instrument demand, such as for a pitch “tendency” note or a slur that doesn’t respond well. I’m not sure if Mr. Leonard means for this fingering chart to imply that there are different focuses/voicings for different notes on the instrument, but voicing higher or lower to increase the success of certain multiphonic sounds works well for me. And, as a matter of convenience, I do use a similar arrow system to pencil in hints for multiphonics in repertoire that I play.

9 Comments

  1. Out of curiosity, is there a specific way that you like to notate flick, or optional, keys on your bassoon diagrams? There are a few notes in the lower register where I’d like to note that the whisper key is optional. I’d also like to highlight the flick keys in a way where I can specify that a certain background in the key means flicked.

    I’ve noticed that you have different color options for this, but these won’t necessarily copy well, especially in grayscale or monochrome.

    Any thoughts?

      1. These charts are great, but I would love to see the option to introduce a line or a cross to put over a key to show which key to trill. I’m preparing a part for publishing, and the main part of the score will be in b/w so can’t use the colours option to show multi phonic trill fingerings. Any plans to introduce this feature?
        Thanks!! Ruth

  2. I have used the fingering diagrams to create a “blank” fingering chart for my students. I use it to test them, to have them keep track of new fingerings as they learn them, etc. It is a great resource!

  3. Hi, Bret! Really appreciate the work you have done with making coding fingerings more accessible. A friend of mine (Japhet) and I just finished a fingering chart project or our own that is strictly for mobile/tablet devices. I’d love to hear your thoughts! You can find it on your phone at http://www.fingercharts.com/flute/

    Also, WOW, you have the biggest resource page I have ever seen in the flute world—thanks!!

  4. Where did you find the images of notes on stave stave lines, you mention in the example of making a chart using a word processor?

  5. As a new EWI player, this tool was a godsend. Learning all of the alternative fingerings to make trills happen was proving daunting, but your tool allowed me to add the diagrams to my practice copies (using MuseScore) and I couldn’t be happier!

Leave a Reply

Your email address will not be published. Required fields are marked *

Comments that take a negative or confrontational tone are subject to email and name verification before being approved. In other words: no anonymous trolls allowed—take responsibility for your words.

This site uses Akismet to reduce spam. Learn how your comment data is processed.