Woodwind playing and pedagogy

  • The role of tone exercises

    Tone exercises are useful, sort of. Read last month’s post about tone for a reminder why tone exercises are only part of the process.

    photo, valentina
    photo, valentina

    Here is what tone exercises do:

    • Excellent tone exercises demand solid fundamental tone-production technique, providing a chance to habituate useful muscular actions. Trevor Wye’s “Flexibility I” flute exercise is a perfect example. (I suggest you buy the whole Trevor Wye omnibus edition.) If your tone-production technique is correct, you can play the exercise successfully (in tune, in time, with all notes responding easily). But you will fail if your breath support, voicing, and/or embouchure are bad. If you are doing something wrong, you get immediate feedback.
    • Poorly-designed tone exercises lack that self-destruct trigger. Often the creators try to prop them up with text explaining fundamental technique: “Use strong breath support! Keep your embouchure flexible!” If that kind of textual instruction is necessary to make the exercise useful, then the content probably doesn’t really matter—it might as well be a single note with a fermata.
    • Regardless of quality, any exercise you do with tone in mind is an opportunity to focus on your tone. That’s a good thing.

    Seek out high-quality tone exercises and do them regularly, but don’t forget to listen.

  • Achieving an ideal tone

    A lot of the questions people have about woodwind playing center on tone: how can I get a better tone? a darker tone? a tone like _____’s? There’s not a lot of clarity on this, for a few reasons:

    • Firstly, of course, “good” tone is subjective, and trying to communicate clearly about tone in more dispassionate terms is problematic due to inconsistent vocabulary.
    • Tone is made from a recipe of factors, so it’s hard to isolate individual ones. Will adding another egg improve your cake? Depends on what else is in it. Will a certain warm-up exercise or piece of equipment have a specific effect on your tone? Depends on what other equipment and playing techniques you are using.
    • Much of what affects tone is difficult or impossible to observe and measure.

    Let’s look at the physical factors that influence tone:

    • Yes, of course, equipment. It’s axiomatic in woodwind playing that your equipment does affect your tone, but not as much as you affect your tone. Still, your particular combination of headjoint, reed, mouthpiece, ligature, barrel, bocal, instrument, and various other parts and accessories does influence in some way the sound that you make. Equipment of good design and construction, and within typical parameters, will contribute to an essentially characteristic tone quality. (By characteristic I mean easily identifiable as a specific instrument by someone with a musically-educated ear.)
    • Basic woodwind-playing techniques, including most notably breath support, voicing, and embouchure. Assuming these are well-trained, they also contribute to a characteristic tone quality.
    • Some subtle aspects of those woodwind-playing techniques that are hard to pin down. These small things determine how the tone fits into the larger world of characteristic tone qualities, usually described poorly in vague terms like “good” or “pure” or “rich” or “buttery” or “vocal.” For example, an oboist’s embouchure puts different pressures on different parts of the reed. Those pressures can be adjusted very subtly using the small and flexible muscles of the embouchure, but most oboists probably aren’t very aware of exactly what adjustments they are making (though they may know what it feels like). Most are also not very capable of passing that wisdom (i.e. a feeling) along to a student or colleague. Some of them can be described in too-general terms (“bring the corners of your mouth in more”), or can be evoked with spotty accuracy through metaphor or through tone exercises.
    photo, Tom Page
    photo, Tom Page

    So, how do you ever develop a tone that is characteristic, personal, and beautiful?

    • Use appropriate equipment.
    • Employ solid fundamental woodwind-playing techniques.
    • Listen frequently, widely, and at length to good music, particularly on your instrument, to develop a tone concept—an aural impression of your ideal tone. In early stages, that might be based on how deeply you have absorbed the sound of a favorite musician, perhaps your teacher. In later stages, it might be a sort of composite of your favorite aspects of many tones that you have internalized, perhaps even things that inspired you about a performance on an instrument other than your own (or a voice). Ultimately, it might be a tone that you have never heard before, but which you can imagine.

    Here’s why tone concept is so crucial:

    All those subtleties of woodwind technique that affect tone, the ones that are so hard to understand and communicate? You can find them with patient and dedicated practice, if you know what you are listening for. As you have already discovered, your tone tends to change from day to day. This inconsistency can be a problem, but can also be a way of stumbling, even subconsciously, onto something positive. (When it’s a conscious process, your thought might be, “when I hold my embouchure this way, I get a sound that is more _____.”) Additionally, a clear tone concept may aid you in intuitively pursuing it; you already use the muscles of breathing, voicing, and embouchure to intuitively produce a huge and subtly-differentiated set of speech sounds, and for most of those you would be hard-pressed to explain how you make them. If you get comfortable and familiar enough with your instrument through years of practice, you can begin to tap into that intuitive control, but again: only if you know what sound you want to make.

    An ideal tone is a lifelong pursuit—invest in yours by listening and practicing daily.

  • Practicing and breathing

    When I play woodwind instruments in a stress situation, such as a performance (or, back in my student days, a lesson), one of the first things affected is my breathing.

    Maybe you have had this experience. The performance begins, and the breathing seems somehow off. You find yourself breathing in awkward or unaccustomed places, ending up either short of breath or too full of stale air. You end up skipping notes or whole measures of music to reset your breathing and get back on track, but panic has already set in and things spiral.

    Most of our favorite practice tips and tricks are about finger technique or articulation or tone, and are meant to help ensure solid performance even when the stress kicks in. But sometimes we forget to practice breathing. Don’t let your performances be derailed by panicky breathing—practice the breaths just like you practice the notes.

    photo, jean-daniel pauget
    photo, jean-daniel pauget

    Make breaths part of the process from day one. Don’t assume they will fall into place once you have learned the notes—by the time that is done, you may have unwittingly “practiced” breaths in less-than-ideal spots. Make thoughtful breathing decisions the first time you practice a new étude or repertoire piece, and mark them in. Create a habit of breathing only at the places you have marked.

    You are hopefully starting your practice of the piece below tempo, so your breathing needs may change as you approach performance tempo. That’s okay—you can always change the markings as your tempo and interpretation progress. Be flexible about moving breath marks around, but disciplined about observing them.

    This approach makes your chosen breaths habitual, so hopefully they are less likely to change when you are nervous or distracted. It also creates a mindset of breathing purposefully, rather than winging it.

    It’s worth pointing out, too, that controlled breathing can actually reduce your body’s stress response, so practicing deliberate, relaxed breathing can help prevent the panic-breathing spiral.

    Breathe easy!

  • Woodwind doubling for flutists

    Here is a cleaned-up version of my lecture notes from a presentation on woodwind doubling I gave last week at the Mid-South Flute Festival:

    Woodwind doubling for flutists

    • What is doubling?
      • Primary-to-secondary doubling: Playing multiple instruments within a family, such as flute (primary), piccolo (secondary), and alto flute (secondary)
      • Primary-to-primary doubling: Playing instruments from different families, such as flute (primary), clarinet (primary), and saxophone (primary) [The idea of primary-to-secondary or primary-to-primary doubling comes from a web article by Mary AllyeB Purtle.]
    • Why double?
      • More (and more varied) gigs. Also, doublers can sometimes get bonus pay.
      • More teaching opportunities
      • Larger network
      • Fun; expanded horizons
    • Flute with non-flute woodwinds
      • Doubling opportunities in musical theater, backing up singers, jazz big bands (requires strong saxophone). With strong enough skills on secondary instruments, gigs on those instruments become a possibility. Employers often value musicianship over virtuosity.
      • The flutist’s advantage: flute and especially piccolo are often weak spots for woodwind doublers. A strong, soloistic flutist with at least basic reed skills can be a hot commodity.
      • For maximum pre-existing gig opportunities, add alto saxophone first, then clarinet. Convincing swing style is also helpful. For create-your-own opportunities, any combination can work!
      • To do multiple-instrument teaching really well, you need to play all of your teaching instruments well! To do this at a lower level, you will at least need to be familiar with current/respected pedagogical literature, a variety of repertoire (including method books, etudes, and solos), a variety of excellent recordings, and a variety of equipment options.
    • Flute with other flute-like instruments
      • Doubling opportunities in situations that increasingly call for “other” flutes: recent musical theater, studio recording, even recent orchestral music. Check out my dissertation on this topic.
      • “World” transverse flutes: bansuri, dizi, “Irish” flute. Also non-tradition-linked bamboo, wooden, or plastic flutes
      • Historical transverse flutes (baroque, etc.)
      • Fipple flutes: recorders, pennywhistle (tinwhistle)
      • Endblown flutes: quena, shakuhachi, panflutes (Romanian, South American)
    • Getting started
      • Be a beginner (but an informed beginner). Get a good teacher. Buy quality instruments within your price range. Do thorough work from good method books. Give yourself all the advantages you wish you had had when you started the flute.
      • Work out a practice schedule that reflects your priorities. If you are juggling a lot of instruments, it may not make sense to practice each one each day, but do practice each one at least a few days in a row to get some momentum.
      • What to practice? If your goal is maximum gig employability, prioritize intonation, rhythm, tone, and sight reading. Practice scales, arpeggios, and other technical drills in all keys, through the full range of the instrument. (Musicals are notorious for “singer” keys and unforgiving tessituras!) Begin working methodically through time-tested etude and technique books. Start learning the easier standard repertoire if that suits your goals.
    • Will doubling hurt my flute playing?
      • Some flutists believe that doubling can damage your embouchure. Realistically, if reed playing is leaving your embouchure swollen, numb, or sore, you need to reexamine your reed-playing approach. Embouchure muscles are agile, flexible, and accustomed to doing varied tasks: playing the flute, eating, speaking, facial expressions. If your tone production on all instruments is based on solid principles, embouchure is not an issue.
      • The real issue: doubling diverts time, money, and mental energy away from flute playing. Committing to “serious” doubling means committing to less time with the flute.
  • Repair or buy new?

    Should you have your old (woodwind) instrument repaired, or put the money toward a new one? Here are a few things to consider.

    First, you should understand the difference between having “playing condition” repairs done and having a full overhaul done. The overhaul is an expensive service, often costing a significant percentage of what you would spend on a new professional instrument. A good overhaul will make your instrument play like brand new, or better. It generally includes any necessary repairs to the instrument’s body, straightening/realigning/refitting of keywork and tenons, replacement of all or most pads/corks/felts/springs, and thorough cleaning and lubrication. The overhaul makes sense about every 5-10 years for a well-made, professional quality instrument that you love and intend to play long-term. It’s generally not worth the money for a student-quality or so-called “intermediate” instrument.

    photo, Keith Jenkins
    photo, Keith Jenkins

    Playing condition repairs are cheaper, à la carte services to get the instrument back into a baseline playable state, maybe replacing a few pads or corks as needed, or fixing anything that is broken enough to make the instrument unplayable. If you are low on cash, a good repair shop can help you prioritize what needs to be done within your budget. Even if you are playing your dream instrument and getting it overhauled on a regular schedule, playing condition maintenance is usually needed on at least an annual basis to keep things working well.

    If your instrument is of less-than-professional caliber, or if you want qualities that your current instrument does not possess, you may be better served by having playing-condition work done for now, and saving toward a new instrument. Bear in mind that “professional” is a term applied by makers and retailers to sell instruments; if you’re not sure, it wouldn’t hurt to check in with a real professional (such as your private teacher) to see if what you are playing on is really suited to professional use.

    If you are playing on an older professional model, you might want to explore the improvements made to more recent instruments, especially with regard to ergonomics, intonation, and evenness of tone. (Some musicians make these comparisons and decide to stick with what they’ve got, and that’s okay, too.)

    A high-quality, well-maintained instrument makes playing easy and a pleasure, and the instrument’s career might even outlast yours.

  • Trevor Wye’s “Flexibility I” flute exercise

    One of my favorite flute warmups is “Flexibility–I (after Sousseman)” from Trevor Wye’s Tone book. (Just buy the whole omnibus edition and thank me later.) This exercise is value-packed and meticulously thought out, and leads inevitably to some fundamental truths about flute playing.

    The exercise is slurred arpeggiated figures, like this:

    wye-1

    As you might expect, the figure gradually expands to larger intervals and notes in the third octave. It’s challenging to make the intervals smooth and accurate, but especially so if your approach to flute tone production is based on unclear or faulty pedagogical concepts. Wye provides some very crucial advice that is key to getting the most out of the etude, and to developing a solid approach to tone production.

    Wye suggests first playing the etude omitting the highest notes, and dynamically shaping the figures as follows:

    wye-2

    The forte dynamic on the lowest notes demands a low, open voicing and strong breath support, feeding into an aperture that is “focused” (small). The dynamic shape, stretched mostly across a single note (B-flat here), also requires the aperture to be agile and flexible, opening slightly for the loudest notes and closing slightly as the volume decreases.

    The next step is to “work up” to the high note, “so that it sounds softly, but not flat:”

    wye-3

    There is a lot going on here. The aperture has to continue to move flexibly in order to produce the dynamic effect. Voicing has to be low and open to make the low notes full and responsive. Breath support has to remain powerful and steady to keep the pitch buoyed up. And something has to happen to produce the register change.

    Many flute teachers suggest making the aperture smaller to achieve the higher registers, but this ties register to dynamics—the larger aperture makes the low notes loud, and the small aperture makes the high notes soft. Others suggest something like increasing air pressure or using “faster” air. This can be accomplished by increasing breath support and/or by using a higher voicing; changing these has a destabilizing and register-bound effect on pitch and tone. It also creates the opposite dynamic problem from aperture-based register changes: the higher notes are always loud, and the low notes are always soft.

    The most effective approach is to allow the embouchure to push forward for notes in the upper registers, and to relax back for lower registers. This allows breath support, voicing, and aperture to function separately, and intonation, tone, and dynamics to be manipulated independently. The Wye exercise demands all of this from the flutist.

    This is a great exercise to incorporate into a daily warmup. I especially like it for its coverage of several flute tone production concepts, since doubling on several instruments means I don’t have as much time to devote to the flute as I would like. Work on it slowly and deliberately—as Mr. Wye points out, “this may take time.”

  • Beginners, parents, and making double reeds

    I am in touch fairly often with parents (and school band directors) about their young oboists and bassoonists. Obtaining suitable reeds at an affordable price is of course an Ongoing Problem for beginning double reed players and their adjacent adults. Invariably my advice is that they connect with a private teacher who can supply and adjust reeds. But there aren’t many of those in the area, and, of course, they cost money, so sometimes the conversation turns toward reedmaking, which they may have read about on the internet and which seems to them like a promising solution.

    If you are a parent or band director, here is what you need to know about reedmaking:

    photo, Javier
    photo, Javier
    • Making oboe or bassoon reeds is an art that takes many years to master.
    • While there are some fine books, videos, etc. that teach reedmaking concepts, there is no substitute for studying reedmaking with an oboe or bassoon teacher.
    • Reedmaking ability is very dependent on playing ability. Most of reedmaking is an iterative process of testing the reed, making a tiny adjustment, testing again, adjusting again, and so forth. A beginner’s playing level isn’t enough for reedmaking, even if they somehow manage to master the physical reedmaking techniques. (At youngest, I might start reedmaking with a very dedicated and talented high school junior.) This is also why it won’t work to learn to make reeds yourself for your child or student, unless you already happen to be a fine oboist or bassoonist.
    • Reedmaking is expensive! Someone studying the art of reedmaking will make many, many, many reeds before it starts to be a good deal financially. A minimal set of tools can be had for maybe the cost of a couple of car tires, but will require the purchase of cane that is already partially prepared. Each piece of prepared cane costs about as much as a large order of French fries, and a beginning reedmaker may ruin dozens or hundreds of them before making their first somewhat usable reed, and hundreds or thousands more before they can make reeds as good as ones from an excellent private teacher. (Cane purchased in its raw tube form is cheaper, but requires additional equipment costing as much as a transatlantic flight, plus extra hours of work.)
    • It may be worth pointing out, too, that reedmaking involves razor-sharp tools. These can of course be handled safely with proper training, but it’s still a concern where small hands are involved. Pieces of cane can be dangerous, too—I’ve cut myself more times with sharp or jagged pieces of cane than I have with knives or razor blades.

    The best thing you can do for your beginning oboists or bassoonists is to pair him or her with excellent teachers who can help them improve their skills on their instruments, make and adjust reeds for them, and lay the groundwork for future instruction in reedmaking.

  • |

    Practice slump checklist

    Sometimes my students complain that they have had bad practicing days or weeks. Not that I have ever had this problem (ahem), but here are a few ideas for breaking out of a practicing slump.

    photo, Katy Wrathall
    photo, Katy Wrathall
    1. Check equipment. Slightly-malfunctioning gear can make you feel like a bad player. Be sure to eliminate this possibility.
      • Are your reeds functioning well? Prioritize response-balanced-with-stability over more subjective and malleable things like tone. Many reed players use unnecessarily stiff reeds; consider trying something a little softer if you haven’t lately.
      • Is your instrument functioning well? If you know how, check the most important adjustment screws (oboe: left hand stack, left G-sharp key, F resonance; saxophone: bis, G-sharp, right hand stack). Re-check basics like alignment of bridge keys. And, of course, make sure your instrument gets regular (at least annual) maintenance checkups. Professional instruments should probably get full mechanical overhauls every 5-10 years.
      • Are you using the best equipment for you? Don’t let new purchases be your go-to solution for every problem, but in some cases replacing an instrument or accessory can remove a roadblock to progress. (Do a reality-check with your teacher to make sure you aren’t just throwing away money chasing a quick fix.)
    2. Check technique. It might be you after all.
      • Have you warmed up thoroughly and correctly today? It’s best to do this at the beginning of your practice session, but there’s no rule that says you can’t warm up some more mid-session to double-check your tone production and reset your mental focus.
      • Have you reviewed all your fundamentals? Take a closer look at your posture, hand position, breath support, embouchure, voicing, finger movement, etc. Have you slipped back into a bad habit? Are you suffering the effects of a technique deficiency you know you should fix but haven’t gotten around to yet? If you don’t know how to fix it, check in with your teacher.
      • Can you release some tension? Frustration often goes hand-in-hand with tense muscles. Consider doing a little deep breathing, stretching, mindfulness practice, yoga, Alexander Technique, or whatever else puts your body back in balance.
      • Have you laid sufficient technical groundwork? If you are working on something especially difficult, is there something else you could practice as an intermediate step? Études, technical exercises, or other preparatory material can help bridge the gap between your current ability level and the ability level you need.
    3. Check your health. If your body isn’t responding well, your practice sessions will be difficult and unpleasant.
      • Have you been getting enough quality sleep? Implementing good sleep habits is a major upgrade to the function of your mind and body.
      • Are you eating balanced meals? Are you eating enough? Are you eating too much? Is your diet too low on good stuff and/or too high in bad stuff?
      • Are you getting outside for at least a few minutes of sunshine and “fresh” air? Sunshine is important to your body’s vitamin D level.
      • Are you stressed, or otherwise not at your best mentally? In some cases, professional counseling and/or treatment may be needed. If you are a college student, there is a good chance there are free, discreet counseling services available on your campus. In other cases, taking a break, getting a little exercise, talking something out with a friend or loved one, or just getting a change of scenery might be enough.
    4. Check your mindset.
      • Are you practicing mindlessly or without direction? Try making a short list of goals you would like to accomplish during this practice session. If you’re not sure where to start, make a quick recording (perhaps with the voice memo app on your smartphone) and listen to it to get some ideas about what needs improvement. If you don’t meet all your goals, you can tackle them again tomorrow or re-prioritize.
    5. Check your environment.
      • At what time of day are your practice sessions the most productive and pleasant? Do you practice best in the morning before your body is tired and your brain is full? Or do you get a second wind after the sun goes down?
      • What locations are most conducive to good practice sessions? Sometimes just changing the scenery can revitalize your focus and productivity. Practicing in places with different acoustical qualities can make you hear yourself in new ways and get your creative juices flowing.
      • What distractions are getting in your way? Can you reduce or remove them?
    6. Check your ego. Practicing should challenge you, but not overwhelm you.
      • Are you working on music that is inappropriately difficult for your current abilities? If you have some freedom to choose what you practice, consider working on something else for now and tackling this project later. If you are committed to a performance of something very difficult and have to make it work, be sure to include other things in your practice session that you can be successful at, to keep your motivation primed.

    Don’t let poor practice sessions bring you down—use them to refine your habits and make the next session your best yet.

  • Creating fingering charts with diagrams from the Fingering Diagram Builder

    My Fingering Diagram Builder has been around for a little over five years now. I was careful to name it the Fingering Diagram Builder instead of the Fingering Chart Builder because it is a tool for creating individual diagrams, not for assembling them into comprehensive fingering charts. But the difference can be a little confusing, so I get frequent questions from users who complain that they can’t figure out how to create and download a “chart” with multiple fingerings on it.

    The reason I didn’t try to build a complete system for creating fingering charts is that I assumed users would have widely-varying needs, and would do better to assemble charts using some other kind of software. Here are a few examples of how that might be done, using music notation software, using a word processor, and using a text editor to create HTML code (such as for a website). All the software I’m using here is free to download on Windows, Mac OS, and Linux, but whatever free or commercial programs you are already using probably have similar features. You’re on your own to work out the details (and feel free to share them in the comments if you are feeling helpful).

    Creating a fingering chart in music notation software

    I am using MuseScore here, but commercial software like Finale and Sibelius and other free software like LilyPond could be used in similar ways.

    First I set up a musical “score” with the notes for the chart. I used whole notes, separated by double bar lines, but that’s up to you.

    MuseScore setup

    Next I created my fingering diagrams in the FDB. I sized the diagrams “tiny” with “thick” lines.

    Adding the diagrams to the score is very simple in MuseScore—I just dragged the downloaded diagrams from my file manager right onto the score. If I drag the diagram and hover it on top of a note, that note gets highlighted. Then I can release the diagram and it attaches to the note.

    musescore-drop

    Initially the diagrams are placed right on top of the note. I selected the diagrams and used the Inspector panel to give them a horizontal offset of -2.5sp and a vertical offset of -10.5 sp, which moved them above the staff, more or less centered above the noteheads. I adjusted the A and tenor B-flat fingerings’ horizontal offsets a bit more to make them look just right.

    Here is the finished product, a small chart with a few bassoon fingerings:

    bassoon-fingering-chart-sample

    Creating a fingering chart in word processing software

    I am using LibreOffice Writer, but something like Microsoft Word or Apple Pages would work just as well.

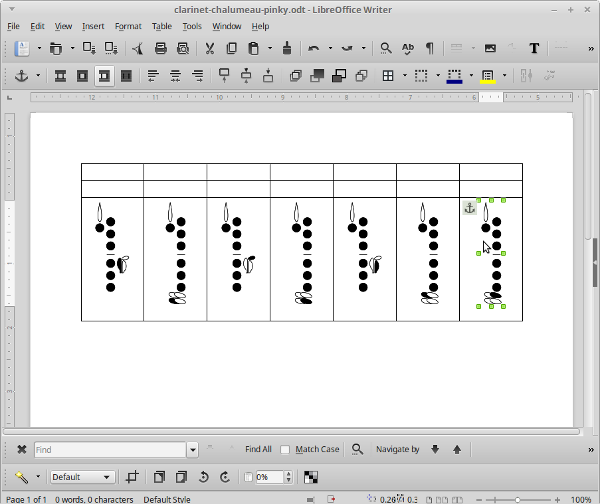
    First I opened a new document and inserted a table. My table has three rows and seven columns.
    writer-table

    Then I dragged the downloaded diagrams from my file manager into the bottom row of the table.

    writer-diagrams

    I merged some cells together, dragged in some images of notes on staves, and added some text.

    writer-complete

    A few more little tweaks and here is the finished chart:

    clarinet-fingering-chart-sample

    Creating an HTML fingering chart in text editing software

    This code be used in any text editor or HTML source editor, and of course similar results could be accomplished with a visual/WYSIWYG editor. I’m not showing complete code here, just the most relevant parts.

    I started with a framework for a table that I could use to show a note with two alternate fingerings. (This is a flute fingering chart with horizontally-oriented diagrams. For an instrument with vertically-oriented diagrams, you may want to rearrange things a bit.)

    <table>
      <tr>
        <th rowspan=2><!— note image here —></th>
        <td><!— first fingering image here —></td>
        <td><!— first fingering text here —></td>
      </tr>
      <tr>
        <td><!— second fingering image here —></td>
        <td><!— second fingering text here —></td>
      </tr>
    </table>
    

    Then I plugged in <img> tags and text:

    <table>
      <tr>
        <th rowspan=2><img src="images/f-sharp-note.png" /></th>
        <td><img src="images/f-sharp-standard.png"</td>
        <td>Standard</td>
      </tr>
      <tr>
        <td><img src="images/f-sharp-trill.png"</td>
        <td>Trill from E</td>
      </tr>
    </table>

    I duplicated that code for additional notes. Since this is a sample alternate/trill fingering chart, each note has at least two fingerings. For notes with more fingerings, I added <tr>s and changed the rowspan values accordingly.

    I also added a little CSS to spruce things up:

    <style>
      table {
        display: inline-block; /* make tables wrap gracefully depending on screen width */
        margin: 1em; /* put some space between tables for legibility/clarity */
      }
      th img {
        max-width: 8em; /* manage size of note images */
      }
    </style>

    Here is the result:

    flute-fingering-chart-sample

    I hope that sparks a few ideas for you if you are considering putting together a fingering chart. If you have other methods or tips, please share in the comments section!

  • Endurance and breath support

    Physical endurance can be an issue for woodwind players, most often manifesting as fatigue in the muscles of the embouchure. But I think in most cases tired facial muscles are a symptom of a more fundamental problem.

    The muscles used for forming woodwind embouchures are small and finely-tuned for precise movements, such as in speech and in facial expressions. This also makes them well-suited to the fine control needed for woodwind playing. But those muscles are not really adapted to feats of strength or endurance.

    photo, Denise Coronel
    photo, Denise Coronel

    Tired and sore embouchure muscles lead to additional problems, such as compensation by clamping down with the larger, stronger jaw muscles, which sacrifices control and causes woodwind players (especially reed players) to bite into their own lips. (As a less-experienced player, I thought of those raw, swollen, and eventually calloused spots in my lips as signs of dedication to practicing. I don’t have those spots any more. In many cases, the need for some kind of cushion or dental appliance over the teeth when playing is a sign of unnecessary biting.)

    Woodwind players should be doing most of their physical “work” with muscles that have strength and stamina. The “core” muscles of the torso have both: they are an integral part of posture, balance, and virtually all gross motor activities (walking, jumping, lifting, sitting, standing, and many more). The core muscles are also the muscles of breath support, which is arguably the most crucial, foundational aspect of woodwind playing.

    Powerful breath support takes a huge burden off the facial muscles. For example, it stabilizes pitch, reducing the need to “lip” notes up or down (which is a less-effective technique anyway); it strengthens and solidifies tone, reducing the tendency to “control” the tone (poorly) by biting or squeezing with the lips; and it eases response, reducing tension. Weak breath support leads to biting and pinching with the embouchure, and that tension spreads throughout the body.

    When you start to feel your embouchure muscles start to tire, allow your face to relax, and focus instead on powerful abdominal breath support.