My Fingering Diagram Builder has been around for a little over five years now. I was careful to name it the Fingering Diagram Builder instead of the Fingering Chart Builder because it is a tool for creating individual diagrams, not for assembling them into comprehensive fingering charts. But the difference can be a little confusing, so I get frequent questions from users who complain that they can’t figure out how to create and download a “chart” with multiple fingerings on it.
The reason I didn’t try to build a complete system for creating fingering charts is that I assumed users would have widely-varying needs, and would do better to assemble charts using some other kind of software. Here are a few examples of how that might be done, using music notation software, using a word processor, and using a text editor to create HTML code (such as for a website). All the software I’m using here is free to download on Windows, Mac OS, and Linux, but whatever free or commercial programs you are already using probably have similar features. You’re on your own to work out the details (and feel free to share them in the comments if you are feeling helpful).
Creating a fingering chart in music notation software
I am using MuseScore here, but commercial software like Finale and Sibelius and other free software like LilyPond could be used in similar ways.
First I set up a musical “score” with the notes for the chart. I used whole notes, separated by double bar lines, but that’s up to you.

Next I created my fingering diagrams in the FDB. I sized the diagrams “tiny” with “thick” lines.
Adding the diagrams to the score is very simple in MuseScore—I just dragged the downloaded diagrams from my file manager right onto the score. If I drag the diagram and hover it on top of a note, that note gets highlighted. Then I can release the diagram and it attaches to the note.

Initially the diagrams are placed right on top of the note. I selected the diagrams and used the Inspector panel to give them a horizontal offset of -2.5sp and a vertical offset of -10.5 sp, which moved them above the staff, more or less centered above the noteheads. I adjusted the A and tenor B-flat fingerings’ horizontal offsets a bit more to make them look just right.
Here is the finished product, a small chart with a few bassoon fingerings:

Creating a fingering chart in word processing software
I am using LibreOffice Writer, but something like Microsoft Word or Apple Pages would work just as well.
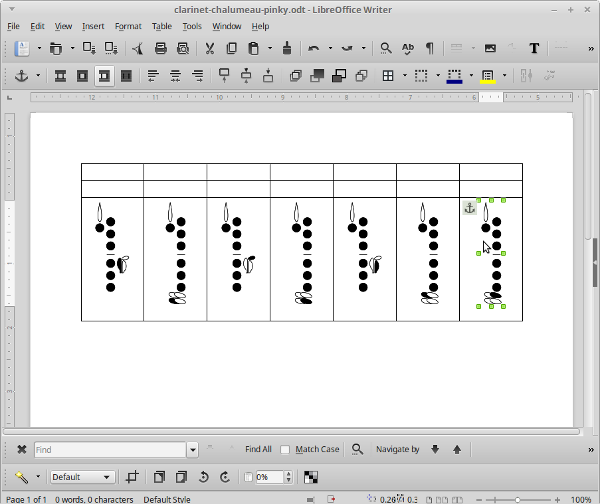
First I opened a new document and inserted a table. My table has three rows and seven columns.

Then I dragged the downloaded diagrams from my file manager into the bottom row of the table.

I merged some cells together, dragged in some images of notes on staves, and added some text.

A few more little tweaks and here is the finished chart:

Creating an HTML fingering chart in text editing software
This code be used in any text editor or HTML source editor, and of course similar results could be accomplished with a visual/WYSIWYG editor. I’m not showing complete code here, just the most relevant parts.
I started with a framework for a table that I could use to show a note with two alternate fingerings. (This is a flute fingering chart with horizontally-oriented diagrams. For an instrument with vertically-oriented diagrams, you may want to rearrange things a bit.)
<table>
  <tr>
    <th rowspan=2><!— note image here —></th>
    <td><!— first fingering image here —></td>
    <td><!— first fingering text here —></td>
  </tr>
  <tr>
    <td><!— second fingering image here —></td>
    <td><!— second fingering text here —></td>
  </tr>
</table>
Then I plugged in <img> tags and text:
<table>
  <tr>
    <th rowspan=2><img src="images/f-sharp-note.png" /></th>
    <td><img src="images/f-sharp-standard.png"</td>
    <td>Standard</td>
  </tr>
  <tr>
    <td><img src="images/f-sharp-trill.png"</td>
    <td>Trill from E</td>
  </tr>
</table>
I duplicated that code for additional notes. Since this is a sample alternate/trill fingering chart, each note has at least two fingerings. For notes with more fingerings, I added <tr>s and changed the rowspan values accordingly.
I also added a little CSS to spruce things up:
<style>
  table {
    display: inline-block; /* make tables wrap gracefully depending on screen width */
    margin: 1em; /* put some space between tables for legibility/clarity */
  }
  th img {
    max-width: 8em; /* manage size of note images */
  }
</style>
Here is the result:

I hope that sparks a few ideas for you if you are considering putting together a fingering chart. If you have other methods or tips, please share in the comments section!


AMEN!!! I can’t tell you how many clarinet students I’ve come across that can’t cross the break, only because they’ve been told how hard it was! As soon as my students can cover all of the holes, I add the register key for them for the first time! (that also means, they spent a lot of time getting the embouchure correct before the clarinet was even put together!) My 7 y/o student, who’s hands are barely big enough to cover the holes on an Eb clarinet, is now playing over the break with ease. If we don’t make a big fuss about it, they’ll never think otherwise.
Great post Bret!
My kids don’t know what “The Break” is! I never use that term in my class. The first note that I teach them is the low G, teaching them to cover all the holes. The first exercise I teach them is “Joy to the World”, starting on thumb F. It comes down to covering the holes, as long as the clarinet seals properly. You would be surprised how many of the low pads come with leaks from the rental shop!
I have 2 anecdotes concerning “The Break”.
First, for me, as an adult beginner on clarinet (with experience as a saxophonist), I despaired of ever being able to play the darn thing without squeaking on every other note. The Break was a challenge I wondered if I’d ever be able to overcome. I can now play across The Break, but it took a lot of time in the woodshed to get there.
On the other hand, my daughter began clarinet in 3rd grade, when our elementary band starts. One day, the teacher marveled that the clarinets had just crossed The Break. She had no idea what the fuss was about.
So maybe it’s just that old saxophonists have problems with The Break. :-)
Brett has this nailed—
“If breath support, embouchure, and voicing are correctly established…”
And the same thing for altissimo—just part of the clarinet.
Similar for me coming to saxophone from clarinet to being able to play low notes on saxophone at any dynamic; correct voicing and breath support.
Sax is my primary instrument and clarinet is one of my doubles. I was doing way too much work with throat and embouchure changes, so my teacher took my clarinet and had me sit down beside him. He held the clarinet up to me and said “form a good embouchure and blow.” So I did, and he proceeded to rip some amazing licks out of my clarinet, going over “the break” many times without a glitch. That was a real light bulb moment for me. I was my own worst enemy when playing clarinet. Because I didnt know what notes were coming next it just wasn’t possible for me to anticipate the notes I was afraid of and do the wrong things with my embouchure that had become habit over decades of playing without a teacher. A fundamentally good embouchure and breath support are just that – fundamental to good clarinet playing. It’s not exactly “set it and forget it” but it’s often closer than we are led to believe.
I thoroughly approve of that type of thinking. I learnt the saxophone 35 years ago and it seems much like whistling in it’s difficulty level, but suddenly I need to start playing clarinet – and ‘the break’ was what has always put me off. I find, however, that if I stab about for notes using my knowledge of theory and how the instrument works I am gradually crossing it without really knowing any particular difficulties.
As for the ‘key change’ that appears as you go between registers, that is currently proving annoyingly difficult.