“Tip of the tongue” mythology and the flute

As woodwind players we are often taught that articulation requires the use of the tip of the tongue and no more—to use more than the tip would just be wrong!

For reed instruments, I think this is essentially true, but I don’t think it works that way on the flute. Try this:

  1. Using a reed instrument mouthpiece, or substituting a (clean) finger, simulate “tip of the tongue” articulation. Find the very tip of the tongue and touch it lightly to the tip of the reed (real or imaginary). With the tongue frozen in this position, apply some air pressure. If you allow the lips to “unseal” from around the mouthpiece at this point, air escapes.
  2. Now try it with nothing inside your mouth, in the manner of a flutist. Touch just the very tip of the tongue to your favorite articulation spot (palate, teeth, or maybe lip, depending on your pedagogical pedigree) as though about to tongue a note, and apply air pressure. Notice all the air leaking out? Me neither.

Are you really holding back Ā all that air with just the veryĀ tipĀ of your tongue?Ā While I think “tip of the tongue” is still a useful fiction for flute playing, it seems to me that I must actually use a surprising amount of tongue to seal off the air from escaping—the sides of my tongue contact my molars to help contain the air until I am ready to release it.

Photo, drurydrama
Photo, drurydrama

(The tip of the tongue is effective for reed instruments because it is only necessary to prevent the reed from vibrating as the air pressure is applied—a very small amount of tongue is quite effective for this.)

The “tip of the tongue” is a good concept for helping flutists to keep their articulation light, crisp, and relaxed, and I don’t particularly recommend teaching the sides-of-the-tongue thing to students as it can easily be misunderstood or taken too far. But I do think a clearer understanding of the invisible parts of woodwind playing can help advanced students and their teachers diagnose and solve subtler problems.

Similar Posts

  • The woodwind section in Mozart’s late symphonies

    Introduction

    The woodwind section of the symphony orchestra has long held a place of preeminence. Woodwind historian Anthony Baines gushes: “…the woodwind [section] is a small cluster of musicians in whom the greatest virtuosity in the symphony or opera orchestra is concentrated. It is the orchestra’s principal solo section… They are stars because composers for over two hundred years have made them so…”1 Wolfgang Amadeus Mozart certainly made stars of the woodwinds—in fact, he may have been the most important link between the string-heavy ensembles of the early symphonies and the lush, varied sounds of the post-Beethoven orchestra.

    Nathan Broder points out that Haydn and a multitude of lesser figures made contributions during this same period. However, when comparing Haydn and Mozart:

    Of the two, Mozart was the more progressive. Younger, more impressionable, more sensitive to contemporary music, and possessed of a wider knowledge of it because of his travels, it was he who, after having learned much from the symphonies of Haydn, took the lead and reached the pinnacle of pre-Beethoven instrumentation. It was he in whose work were combined all the progressive tendencies of the various outstanding composers of the time, and whose symphonies present a summing-up of orchestral advancement in the latter half of the eighteenth century.2

    Read More “The woodwind section in Mozart’s late symphonies”

  • |

    Planning breaths

    Disclosure: As an Amazon Associate I earn from qualifying purchases, at no cost to you.

    When learning a new Ć©tude or repertoire piece, it’s common to practice at first with focus on the notes, often playing them at a slow tempo and/or divided into chunks. This is a good approach for mastering the needed finger technique, but it may neglect one of the crucial parts of a performance: breathing.

    In some music, it’s obvious where to breathe. But in a page of nonstop sixteenth notes, it’s harder to find the right places, and to execute them gracefully. Adding to the problem, I find that when I am nervous or playing under pressure, my breathing is one of the first things that falls apart: I start breathing in unaccustomed places, or skipping breaths that I know I really need.

    I recommend establishing a breathing plan early in the process of learning new music. That way you can practice the breaths just like you practice the notes—they become a part of your muscle memory, and will happen automatically even under pressure.

    The first step for a wind player should be to mark in the musical breaths, the ones that demarcate phrases. These are breaths that you will take (or possibly fake) regardless of your need for oxygen, because they serve the music. How exactly to do that is beyond the scope of this post, but here are a few quick tips:

    • Beware breathing at bar lines. They look like nice stopping points, but often don’t make musical sense. (They are there only for your convenience in counting.)
    • Background in music theory helps a lot, but you can also use your ears to help you figure out intuitively where a phrase comes to rest, or steal ideas from a good recording.
    • To go deeper, consider studying phrasing, perhaps from a book like David McGill’s. (Put that one on your wish list if you haven’t read it already!)

    Once the breaths required by the music are in place, you may decide you need more, perhaps because you haven’t worked the piece up to its full tempo yet (or because the piece isn’t written with sensitivity to your desire to survive). Mark in-between “survival” breaths as needed, perhaps in parentheses so you remember which ones they are. Put them in the best places you can find, and execute them as musically as you can, but as your tempo increases you may be able to skip them. If so, be sure to erase them so your marked-in plan stays up to date.

    Choosing places for survival breaths is a trial-and-error process. Mark some in and give them a try, then adjust as needed. If you feel uncomfortable while playing, this can lead to panicked decisions on stage, so choose breaths for your comfort.

    Particularly for the oboe, you may find you need some “breaths” where you can actually exhaleĀ stale air. Mark these clearly, too.

    Always update your pencil marks if you decide to change the plan at all, so that your plan is 100% clear and you can practice it in a consistent way. You can change your mind later, as long as you change your marks.

    To summarize:

    • Start early in the process of learning a new piece.
    • Mark in musical breaths, which you will observe even if you’re capable of playing longer without stopping.
    • Mark in survival breaths, if necessary. Use trial and error to get them right.
    • Practice the breaths just as diligently as you practice the notes.
    • As you get closer to the performance, you might alter the breathing plan as your interpretation evolves, or as you no longer need some of the survival breaths.
    • Be strict about keeping the markings current, and about playing just what is marked.

    Well-planned, thoroughly-practiced breaths contribute to a relaxed, musical performance.

  • Creating fingering charts with diagrams from the Fingering Diagram Builder

    My Fingering Diagram Builder has been around for a little over five years now. IĀ was careful to name it the FingeringĀ DiagramĀ Builder instead of the FingeringĀ ChartĀ Builder because it is a tool for creating individual diagrams, notĀ for assembling them into comprehensive fingering charts.Ā But the difference can be a little confusing, so I get frequent questions from users who complain that they can’t figure out how to create and downloadĀ a “chart” with multiple fingerings on it.

    The reason I didn’t try to build a complete system for creating fingering chartsĀ is that I assumed users would have widely-varying needs, and would do better to assemble charts using some other kind of software. Here are a few examples of how that might be done, using music notation software, using a word processor, and using a text editor to create HTML code (such as for a website). All the software I’m using here is free to download on Windows, Mac OS, and Linux,Ā but whatever free or commercial programs you are already using probably have similar features. You’re on your own to work out the details (and feel free to share them in the comments if you are feeling helpful).

    Creating a fingering chart in music notation software

    I am using MuseScore here, but commercial software like Finale and Sibelius and other freeĀ software like LilyPond could be used in similar ways.

    First I set up a musical “score” with the notes for the chart. I usedĀ whole notes, separated by double bar lines, but that’s up to you.

    MuseScore setup

    Next I created my fingering diagrams in the FDB.Ā I sized the diagrams “tiny” with “thick” lines.

    Adding the diagrams to the score is very simple in MuseScore—I just dragged the downloaded diagrams from my file manager right onto the score. If I drag the diagram and hover it on top of a note, that note gets highlighted. Then I can release the diagram and it attaches to the note.

    musescore-drop

    Initially the diagrams are placed right on top of the note. I selected the diagrams and used the Inspector panel to give them a horizontal offset of -2.5sp and a vertical offset of -10.5 sp, which moved them above the staff, more or less centered above the noteheads. I adjusted the A and tenor B-flat fingerings’ horizontal offsets a bit more to make them look just right.

    Here is the finished product, a small chart with a few bassoon fingerings:

    bassoon-fingering-chart-sample

    Creating a fingering chart in word processing software

    I am using LibreOffice Writer, but something like Microsoft Word or Apple Pages would work just as well.

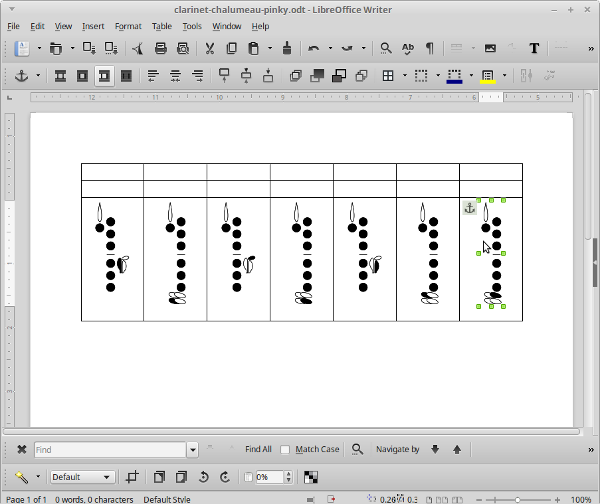
    First I opened a new document and insertedĀ a table. My table has three rows and seven columns.
    writer-table

    Then I dragged the downloaded diagrams from my file manager into the bottom row of the table.

    writer-diagrams

    I merged some cells together, dragged in some images of notes on staves, and added some text.

    writer-complete

    A few more little tweaks and here is the finished chart:

    clarinet-fingering-chart-sample

    Creating an HTML fingering chart in text editingĀ software

    This codeĀ be used in any text editor or HTML source editor, and of course similar results could be accomplished with a visual/WYSIWYG editor. I’m not showing complete code here, just the most relevant parts.

    I started with a framework for a table that I could use to show a note with two alternate fingerings. (This is a flute fingering chart with horizontally-oriented diagrams. For an instrument with vertically-oriented diagrams, you mayĀ want to rearrange things a bit.)

    <table>
      <tr>
        <th rowspan=2><!— note image here —></th>
        <td><!— first fingering image here —></td>
        <td><!— first fingering text here —></td>
      </tr>
      <tr>
        <td><!— second fingering image here —></td>
        <td><!— second fingering text here —></td>
      </tr>
    </table>
    

    Then I plugged in <img> tags and text:

    <table>
      <tr>
        <th rowspan=2><img src="images/f-sharp-note.png" /></th>
        <td><img src="images/f-sharp-standard.png"</td>
        <td>Standard</td>
      </tr>
      <tr>
        <td><img src="images/f-sharp-trill.png"</td>
        <td>Trill from E</td>
      </tr>
    </table>

    I duplicated that code for additional notes. Since this is a sample alternate/trill fingering chart, each note has at least two fingerings. For notes with moreĀ fingerings, I added <tr>s and changed the rowspan values accordingly.

    I also added a little CSS to spruce things up:

    <style>
      table {
        display: inline-block; /* make tables wrap gracefully depending on screen width */
        margin: 1em; /* put some space between tables for legibility/clarity */
      }
      th img {
        max-width: 8em; /* manage size of note images */
      }
    </style>

    Here is the result:

    flute-fingering-chart-sample

    I hope that sparks a few ideas for you if you are considering putting together a fingering chart. If you have other methods or tips, please share in the comments section!

  • Improvisation and doubling

    An important factor in improvising fluently (such as in a jazz context) is a collection of vocabulary. Broadly defined, this could include rote-memorized “licks” plus all kinds of other material: scale- or arpeggio-oriented patterns, for example. With improvisation, you don’t have the luxury of practicing your solo note-for-note; instead you have to develop a large pool of available material, and learn it so well that you can mix and match it on the fly.

    Photo, fantail media
    Photo, fantail media

    If you double on multiple instruments, the vocabulary pool isn’t really portable. You can bring your improvisational ideas with you from instrument to instrument, but you won’t be able to execute them smoothly unless you have put in the practice hours on each instrument separately. If you are doubling, say, saxophone and flute, you might find that the fingerings are similar enough that you can make a few things work, but it’s too easy to paint yourself into a corner, or to catch yourself using “close enough” fingerings that really aren’t, or to play with unsatisfactory tone or intonation. To do it right, and have the colors of multiple instrumental voices available to you as an improviser, treat each instrument like it’s your only one.

  • Giving feedback in masterclasses and competitions

    As a graduate student and younger professional I started to get opportunities to teach in masterclass/workshop settings and to adjudicate competitions. I had taught private lessons for many years. But sometimes I found it challenging to give effective feedback in these newer situations, where I was hearing someone play for the first time and needed to give useful suggestions after just a quick first impression. For example:

    • I would listen to a talented competition entrant who played at a much higher level than my students, and I would find myself at a loss for what to address.
    • I would listen to a struggling masterclass student with deep fundamental flaws in their playing, but it seemed too overwhelming to tackle in fifteen minutes. So instead I would harp on some small detail like an esoteric alternate fingering or the various possible approaches to a certain grace note.

    There are plenty of “right” ways to teach in these situations, but here’s the breakthrough that really helped me:

    1. Have a specific list of things in mind to listen for. In terms of the woodwind sounds I’m hearing, I generally focus on tone, response, intonation, execution of volume/dynamics, and finger and tongue fluency. Assuming these are generally in place, I might also consider non-woodwind-specific musical/interpretive factors.
    2. While listening, make a list, mental and/or written, of a very small handful of items I want to address (sometimes just one). I do my best to pick the most bang-for-the-buck ones, or the ones I haven’t already addressed with another student in the same masterclass, but I don’t stress over it too much.
    3. Have some accumulated ideas of techniques and approaches that can be applied to the problem areas. For woodwind fundamentals, which are appropriately addressed at every stage of advancement, I zero in on posture and playing position, breath support, voicing, embouchure, finger and tongue movement, and fingering selection. For interpretive matters, I might address small-scale phrase shaping, and from there work up to interpretation of larger structures like themes, movements, complete pieces, and even full recital programs.

    Your lists (what to listen for, and what techniques/approaches to apply) might differ from mine, though you are welcome to adopt them if you need a starting point. The object is to have a methodical approach to listening and problem-solving, so I’m making efficient and effective use of time.

    Good luck!

  • |

    Does woodwind doubling prevent you from being the “best?”

    My recent post about woodwind doubling has been cited lately on various social media sites to fuel discussions over whether doubling is a good or acceptable pursuit.

    Many of those arguing that woodwind doubling is a bad idea raise the issue that the “best” players of such-and-such instrument don’t double, and you can’t be the “best” at such-and-such instrument if you are doubling. If you think that, I could name a dozen prominent doublers who might change your mind, but that’s not really the important point.

    As an undergraduate saxophone major, I daydreamed occasionally about being the “best” saxophonist. For me it probably wouldn’t have been a realistic goal, and the pursuit of it wouldn’t have led me to happiness, nor to success as I would have seen it through that lens.

    When I made the decision to commit myself to woodwind doubling as a career path instead, I knew that would mean my progress on the saxophone would slow down. But it has been a very worthwhile choice for me: I get to play interesting music in a variety of settings, I get to spend all day at my university teaching job talking about the music and instruments that fascinate me, and I even have an audience of like-minded folks who stop by to read my blog posts. Now it’s hard for me to imagine myself being content to play just saxophone music all day.

    Most of us won’t land a top orchestral job or tour the world as a concert soloist. And, believe it or not, not all of us want that anyway. We should be encouraging aspiring musicians to seek out niches that they enjoy and are motivated by.

    Very, very few of us will ever be the “best,” so if that is your goal then I wish you luck. But for many of us, myself included, that’s not the goal at all. Mine is to have a successful and enjoyable career doing what I love, and so far, so good.

4 Comments

  1. Thank you. I had my beginning flute players recite “tip of the tongue behind the teeth.” I then told them. “Every time you said ‘t’ that’s where you tongue.” That seemed to work fairly well.

  2. Brett,
    your description makes sense. Noticed that I felt more confident this week at band rehearsal—a community band — usually now play 2nd flute.
    You are correct that having a physically accurate description of what is happening is reassuring.

    I try to be very careful in my descriptions; and be clear when using imagination to accomplish or reinforce an experience.

    The ultimate test— Does it sound good.

  3. Hey Bret! I was wondering if you find this “fiction” to be true for clarinet also. I have never tongued with the tip of my tongue on the tip of my reed, and I find that when students do that they create a thin articulation.

    What do you think?

Leave a Reply

Your email address will not be published. Required fields are marked *

Comments that take a negative or confrontational tone are subject to email and name verification before being approved. In other words: no anonymous trolls allowed—take responsibility for your words.

This site uses Akismet to reduce spam. Learn how your comment data is processed.