Multi-instrument method in Rahsaan Roland Kirk’s “Creole Love Call”

The artist1

Roland Kirk was born in 1935. As an infant, he was blinded, possibly by negligent medical care. He attended the Ohio State School for the blind, where he played in the school band. At the age of sixteen, he led a dance band that performed around the Midwest. It was also at age sixteen that he got the idea to play more than one instrument at once, an innovation he claimed to have received in a dream. He acquired a battery of instruments, including such oddities as the stritch and manzello (obsolete cousins of the saxophone), and set about mastering them individually and in combination.

Kirk recorded as early as 1956, but got little attention until 1960, when critics began to accuse him of gimmickry. Kirk maintained that his unorthodox techniques were born of musical expression rather than cheap showmanship, and his following began to increase.

In 1970, he added “Rahsaan” to his name, having been prompted to do so by another dream.

In 1975, Kirk suffered a stroke that paralyzed his right arm. Kirk continued to perform one-handed. He died in 1977.

The album

Kirk’s album The Inflated Tear is Kirk at his best. Eight of the nine cuts are his own highly original and startlingly varied compositions. Kirk plays tenor saxophone, manzello, stritch, clarinet, flute, whistle, English horn, and flexafone. He is joined by Ron Burton on piano, Steve Novosel on bass, Jimmy Hopps on drums, and *** Griffith on trombone. The 1967 date touches almost as many emotions as Kirk plays instruments.

The tune

Duke Ellington’s “Creole Love Call,” a simple-but-well-loved tune by a revered elder statesman of jazz, seems at first an unsurprising choice for anyone’s album—though interesting in this case as the only selection not composed by Kirk himself. But Kirk’s flair for the extraordinary shapes this performance into a unique musical happening.

Ellington’s best-known arrangement features a pianissimo melody by the reed section, with a clarinet playing the lead part. Kirk’s choice of clarinet and tenor saxophone for his version seems apt, though the complications of playing two instruments simultaneously suggest that this decision could not have been one made without very careful consideration. Kirk manages to include the clarinet melody, altered in places to fit a bluesy shuffle feel, and harmony in the tenor, not to mention covering the vocal part (also in the tenor).

Kirk changes the key from B-flat major to F major (G major for the clarinet and tenor saxophone, both transposing instruments in B-flat). This accommodates the range of notes available using Kirk’s special two-instrument technique. Kirk also shifts the meter from 4/4 to a tripletized 6/4, creating a feel indebted to gospel music as much as to the Ellington band.

The overall effect of Kirk’s rendition is one of respectful but nonimitative tribute. Kirk’s version of “Creole Love Call” is a hard-driving contrast to Ellington’s sleepy Southern portrait. Kirk said, “I did Creole Love Call because words can’t describe what I think of Duke Ellington and his music. The only way I can show how much I dig his music is just to keep on playing.”2

The technique3

Kirk’s performance of “Creole Love Call” is an example of his multi-instrument style using unaltered instruments and relatively few “tricks.” Both clarinet and tenor saxophone have several notes playable with the left (upper) hand only. Kirk uses his left hand on the tenor’s left-hand keys and operates the clarinet’s left-hand keys with his right. The clarinet’s relatively small-diameter bore makes it possible to reach all the necessary keys “right-handed,” but the tenor’s large bore and keys operated with the palm make such a switch impossible.

Putting the saxophone in the left hand presents another problem, however. The tenor saxophone, played in a seated position, generally rests on the saxophonist’s outer right thigh, with its weight supported by a neckstrap and balanced with the right thumb. Moving the saxophone outside the left thigh brings keywork in contact with the leg, causing interference with fingering. It is possible that Kirk used a special stand or other apparatus to hold the instrument, but the low-tech approach of holding the instrument between the legs is a more likely scenario. If held carefully in this manner, none of the keywork is compromised, the inner left thigh can help to balance the instrument, and the keys and mouthpiece can be reached with relative ease.

Adding the clarinet complicates the situation. The weight of the clarinet is usually supported entirely by the right thumb (and balanced with the embouchure, or mouth muscles, leaving the rest of the fingers able to move freely). In this case, however, the right hand is brought out of its usual position near the bell end of the clarinet and used to operate the left-hand keys. A neckstrap can support the clarinet’s weight, but makes no provision for keeping the correct angle for playing. This suggests again that Kirk is playing in a seated position, allowing the bell of the instrument to be rested on the right knee. This position, though a little precarious, makes it possible to play the instrument one-handed. (In attempt to recreate this technique, it would be wise to use a neckstrap anyway—to prevent dropping an expensive and delicate instrument.)

Playing both instruments at once requires a major revision of the standard, “correct” embouchure. Each instrument is normally played with the mouthpiece centered in the mouth. This allows the mouth muscles to provide a supportive cushion on all sides of the mouthpiece. Even slight changes in pressure in any part of the embouchure affect the player’s control of timbre and pitch.

Playing on two mouthpieces at once creates a number of problems: both must be off-center, using weaker and relatively untrained muscles; the slightly different embouchure requirements of tenor saxophone and clarinet and the different sizes of the mouthpieces require an asymmetrical (read: difficult and temperamental) “double” embouchure; and an opening is created in the center of the mouth. To understand the difficulty created by this last point, try inserting two fingers of each hand into the sides of your mouth, then try to close your lips adequately that no air can escape. It is possible only with great effort—and a great deal of tension, an obstacle to good tone, accurate pitch, and range flexibility.

With these difficulties considered, it is surprising that Kirk’s tone on each instrument changes so little during the “solos,” though, admittedly, Kirk’s tone is unarguably unconventional on each. (Any saxophone or clarinet teacher would act quickly to “correct” that kind of tone in a young student.)

The performance

The first chorus of the head is most remarkable for its assurance and refinement. The uninitiated listener would never suspect the same musician is playing the clarinet and saxophone simultaneously. The intonation is especially remarkable to one who has attempted Kirk’s technique; Kirk’s pitch on both instruments is generally above reproach, except perhaps the C (B-flat concert) in measure 16. The articulation is clear and accurate. Of course, ensemble is not an issue—Kirk plays like a pair of well-trained and meticulously rehearsed musicians.

In the second chorus (m. 18), Kirk adds the vocal line (played on tenor). The most technically surprising feat here is the pitch bends in the tenor part. Pitch bends are most often accomplished by a change in “voicing,” involving the position of the back of the tongue (as in creating different vowel sounds in speech). The clarinet’s pitch, however, seems unaffected. Another possible method is to flatten the pitch by loosening the embouchure—impractical in Kirk’s double-horn technique. Kirk may accomplish these pitch bends by partially closing keys, though the smoothness of the bends belies this possibility. The solution to this mystery may lie in Kirk’s choice of notes in the clarinet part. In the first chorus, Kirk uses a sustained G (m.6) and a sustained E (m. 10) in the clarinet melody, but in the second chorus these notes change halfway into a D and a C respectively. There seems at first little reason to complicate the performance further by changing these notes. Closer inspection by a clarinetist, however, will disclose that the G and the E are both somewhat unstable (or easily altered) in terms of pitch, while the D and C are much more resistant to pitch change. A slight voicing change, perhaps used in conjunction with a fingered bend, would give the tenor’s B and B-flat (both easily bent) a bluesy affectation without hurting the clarinet’s pitch.

In the “solo” section, Kirk plays one instrument at a time (clarinet, then tenor), and uses both hands for each.

Kirk’s clarinet solo is a mixture of maturity and naiveté. His use of sustained notes and tremolos seem characteristic of a beginning improviser, but his rhythm and sense for development reveal him as an experienced artist. His note choices, though always appropriate, seem to studiously avoid difficult fingerings. His use of the blues scale in only the low register is especially telling; the B-flat to C to C-sharp would, in either octave of the instrument’s upper range, would strike fear into even a virtuoso’s heart.

The tenor solo suggests Kirk is more at home with this horn. He starts the solo with an altissimo G, a range reserved for advanced players. He also produces a growl on this note by singing and playing at the same time, another sophisticated technique. In measures 44-45 he creates a screaming effect by using the saxophone’s upper partials, an effect favored by rhythm-and-blues players, then improvises a repeating three-note blues motif, another R&B favorite.

In measure 49, Kirk returns to the two horns. He plays a line in octaves that continues into the beginning of measure 52. In this line, Kirk takes advantage of similarities in the horns’ fingerings, essentially doing the same thing with each hand. This suggests that these few measures may actually be improvised, an idea perhaps substantiated by an apparent technical slip-up trying to get back into the melody in measure 52.

The outchorus culminates in a free improvisation on tenor in measure 66. The clarinet continues an “open G” drone, so Kirk is freed to use both hands on the saxophone. The clarinet is, presumably, balanced perilously between embouchure and knee. The length of the final phrase hints that Kirk may be using the circular breathing technique for which he was well known, though it is certainly not impossible for a trained wind player to play a phrase even of this length in a single breath, especially if he has time to get a good breath in before beginning (such as the quarter rest at the end of measure 62).

The verdict

Kirk’s “Creole Love Call” is a success. He rises above the novelty of playing two horns at once and creates a genuine musical masterpiece.

Appendices

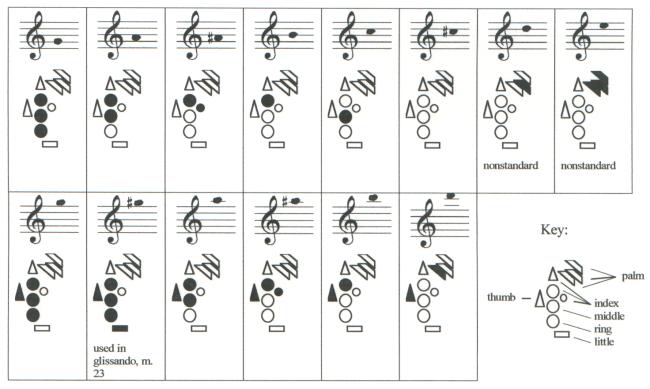
Appendix A: One-handed saxophone fingerings used in “Creole Love Call.” Sound M9 lower.

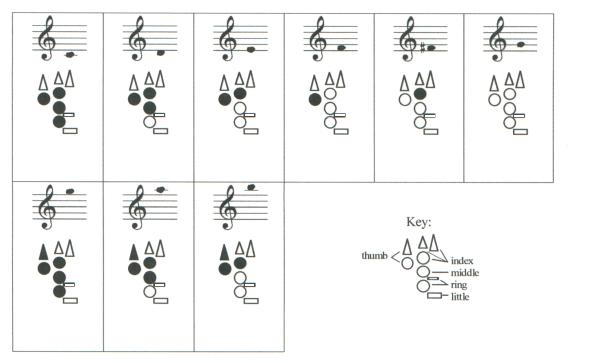
Appendix B: One-handed clarinet fingerings used in “Creole Love Call.” Sound M2 lower. These fingerings are ordinarily played with the left hand, but in this case are played with the right.

Notes

1. Information in this section is compiled from DownBeat.com, The Rahsaan Roland Kirk Web Site, and Michael Fitzgerald’s biography.

2. From liner notes to The Inflated Tear.

3. Information in this section is derived from the author’s own November 2002 attempt to recreate Kirk’s apparently inimitable performance.

Similar Posts

  • Tonguing and language sounds

    Be wary of pedagogical approaches to woodwind articulation that depend on analogies to speech sounds.

    The most common, at least in the English-speaking world, is the idea that tonguing is like saying “too” or “doo.” And certainly there are significant mechanical similarities, especially with “too.” “Doo” doesn’t work as well because it is a voiced consonant, produced essentially the same way as “too” but with vibration of the vocal cords, an undesirable effect for woodwind playing (except for some extended techniques).

    Some teachers recommend something like “too” for crisper articulations and “doo” for gentler ones. If you compare carefully your whispered (unvoiced) “t” and “d” sounds, you may find that they are not, in fact, completely identical. My “t” gives a bit more explosive sound, because I release the entire tongue, and my “d” is softer because I tend to release only the tip of the tongue, keeping the back in contact with my molars. But this difference doesn’t apply to good woodwind playing technique, in which the back of the tongue must be kept independent from the tip in order to manipulate voicing.

    “Loo” is another one that gets mentioned sometimes for gentler articulations. This one also doesn’t work well if taken literally because (1) the “l” sound is voiced and (2) it leaks air around the sides of the tongue. (You can approximate an unvoiced version by whispering “lll…,” but that sound isn’t typically used in English.) A woodwind book I read recently recommends some additional oddities like “droo” or “thoo.” “Droo” doesn’t work well because it has a sequence of two consonant tongue positions, one of which is voiced. “Thoo” (presumably the unvoiced version) leaks air near the tip of the tongue.

    Another point worth making is that consonant sounds in English aren’t necessarily the same as consonants in other languages, so even if we select some workable English consonant sounds, it’s not a given that those are the ideal choices. (Plenty of study has already been done on this topic.)

    And that’s just the consonants. Assuming they are used as a shorthand for describing articulations, with an understanding that they do not precisely represent articulation technique, vowel sounds can still cause confusion. Consider the “oo” in “too.” Vowel sounds are loosely analogous to woodwind voicings, so it is best to match the vowels to the instrument. Is “oo” the right voicing to evoke?

    For low-voiced instruments, an “oh”- or “ah”-like vowel sound is a better match. (“Oh” is still problematic because English speakers pronounce it as a diphthong, two vowel sounds in sequence—this will cause unstable pitch and tone when applied to a woodwind instrument. To avoid this, we must borrow an “o” sound from another language.) For the clarinet, “ee” is the closest match. For saxophones, the vowel sound needs to be somewhere in between, perhaps near the schwa (ə) sound like the “a” in “about.”

    Language sounds can be used only as a very limited analogy for woodwind articulation technique—use them with care.

  • 10 ways to strengthen your embouchure right now!

    1. You don’t need a “strong” embouchure, you need a relaxed embouchure.
    2. Embouchure “strength” is a myth. Stop biting and pinching.
    3. Your embouchure is made up of little facial muscles, which are good at subtle, expressive movements, like for facial expressions and language (or for nuanced variations in woodwind dynamics and tone color). They aren’t good at feats of strength or endurance.
    4. Your abdominal muscles, on the other hand, are very good at strength and endurance. You use them all day long and they probably never feel tired unless you are doing sit-ups or something. Instead of straining with your embouchure, let breath support do the work.
    5. You should probably check on your voicing, too. I mean, you could bite your clarinet up to pitch instead, but it’s painful and causes lots of other problems.
    6. You know that thing where you play a reed instrument and you get a blister or callus from your teeth on your lower lip? Good news, you don’t need a dental appliance or some kind of tape. You just need to relax your embouchure. Try it! Now you can practice for hours without fatigue or blood, and sound better doing it.
    7. Ever try to play in one of the upper registers of the flute, and get an undertone or some dirtiness/growliness in your attacks? The key to clear, beautiful transitions into the upper register is a relaxed and flexible embouchure.
    8. We can argue about whether your jaw is part of your embouchure. Nah, never mind, I have better things to do. But in any case it should be open, creating space for the soft tissues of your lip and facial muscles to make the aperture. Go ahead and unclench. By the way, opening up your jaw is what people really mean when they tell clarinetists (mostly) to do weird things with their chins.
    9. I know, somebody taught you in your formative years about the vital importance of a brutishly muscular embouchure. Take a deep, cleansing breath. Everything is going to be fine.
    10. Go practice.

  • Voicing and clarinet undertones

    A few months ago I shared a list of published opinions on how to avoid undertones on the clarinet.

    Many of the ideas shared by the distinguished authors seemed like just descriptions of good basic clarinet technique (“ensure correct, stable embouchure formation,” “establish breath support/air pressure before releasing tongue”). I agree that the most important way to improve undertones is to have a solid baseline tone production technique. If you can play with a beautiful, characteristic tone, mostly in tune, with good response, then your undertones are probably mostly gone already.

    I do have one small tip that I find helps a great deal with clearing up any remaining undertones, that wasn’t mentioned by any of the sources I consulted. My readers know I frequently discuss the importance of keeping voicing very stable, but as I have indicated previously that’s only one side of a multifaceted issue.

    I have good success with lowering my voicing just a little bit in the upper clarion register. (I tell my students to think of warming the air by just a degree or two.) This seems to stabilize and clarify those notes.

    As always, expect any change in voicing to have multiple consequences, for tone, pitch, and response. In the case of clarinet upper-clarion notes, I find a very slight lowering of my voicing to have only minimal and acceptable effects.

    If anyone is aware of others teaching this technique, I would be curious to hear about it.

  • Woodwind doubling and clarinet problems

    Disclosure: As an Amazon Associate I earn from qualifying purchases, at no cost to you.

    Here are a few of the common problems woodwind doublers have with the clarinet:

    Flabby/saggy/tubby/airy tone and flat pitch. This is a dead giveaway for a self-“taught” clarinet doubler. The clarinet’s voicing is quite high, higher than any of the other woodwinds, and beginning clarinetists sometimes struggle for years to make that proper voicing a consistent habit. Once it settles in, pitch problems mostly evaporate, tone becomes clear and ringing, and notes respond beautifully and easily in every register. If you’re thinking about buying a shorter barrel because your “clarinet” is so flat all the time, don’t. Work on your voicing instead. Voicing is the #1 crucial technique for successful clarinet doubling, and will solve most of your problems.

    It may also be worth checking your mouthpiece angle—it should be quite steep compared to saxophone or double reed instruments. Keep your head up straight and eyes forward, and aim in the ballpark of keeping the clarinet around 30° from vertical. You can also use the paper trick to make sure you’re taking in the right amount of mouthpiece.

    Reeds can be a contributing factor, too. Often (but not always) saxophonists lean toward a slightly more open mouthpiece and softer reed, while clarinetists lean toward a little more closed mouthpiece and stiffer reed. The strength you prefer on a typical saxophone mouthpiece may not be right strength for a typical clarinet mouthpiece.

    Constricted tone. Bafflingly, there’s a common pedagogical idea that clarinetists should tighten their embouchures to fix various problems. This is nonsense. Keep your jaw open to make space for the reed to vibrate, and let your lips (not your jaw/teeth) close around the mouthpiece, not tight but just airtight. Notes will respond more readily, with a fuller, prettier tone, and you can throw away the tape or paper or dental appliance you have been using to cushion your lower lip from your teeth.

    Squeaks. 95% of the time this is an issue of fingers failing to properly cover toneholes. (And 95% of the time, struggling clarinet doublers blame it on something having vaguely to do with embouchure, reeds, or the clarinet somehow just being a squeaky instrument.) Use the large, fleshy pads of your fingers (not the tippy-tips) to cover the holes. Sometimes a quick check in the mirror can reveal that your fingers aren’t where you think they are.

    Fingering awkwardness. The clarinet’s fingering system and unique overtone series provide tremendous advantages: an expansive range, clean and precise technique, and lots of useful alternate fingerings. (It’s superior to the saxophone’s “easier” system with awkward palm keys and relatively few alternates. Fight me.)

    But if you’re coming from another instrument, you might find the 12th between the lower and clarion registers confounding. That’s because you’re still thinking about the fingerings. Practice your scales, arpeggios, and études until your fingers move on autopilot, like they already do on your primary instrument. It can be done.

    The clarinet’s dreaded “break” as a technique concern is mostly a myth. Keep your support, voicing, and embouchure well-formed and stable, and just move your fingers. Your left index finger should rock or tilt between its tonehole and the A key, not hop (losing contact with the instrument) or slide (dragging along the key). Work toward a tiny, efficient, relaxed movement.

    The clarinet’s clever system of redundant pinky keys enables lightning-fast technique in virtually any key, but it takes real effort to learn to use them well. Remember that for those pinky-finger notes there aren’t really “standard” vs. “alternate” fingerings—you need to know them all well enough to use interchangeably. And if you have beginner habits like using both pinkies for third-line B, you will need to learn to use a single pinky in many cases for the most efficient and flexible approach.

    Ledger line catastrophes. Because of the clarinet’s broad tessitura, clarinetists have to be fluent in ledger lines above the staff (maybe more than you’re used to if you’re an oboist) and below the staff (more than you’re used to on any treble-clef woodwind). Hit the Baermann or Kroepsh books for thorough workouts spanning the clarinet’s range.

    Remember the best money you can spend on your clarinet playing isn’t another mouthpiece or barrel or book—it’s some lessons with an excellent teacher. Learn the instrument on its own terms, and, whatever you do, try not to sound like a doubler.

  • A brief thought about new music for saxophone

    Here’s a comment I made by email to Sy Brandon, regarding the saxophone movement of Divertissement, the new multiple woodwinds piece he is writing for me.

    So much contemporary saxophone music is bombastic and grating—I always make sure I bring some aspirin when I attend the saxophone conferences. But the saxophone has such wonderful lyrical qualities, and I’m pleased that the saxophone got assigned to play something pretty in this piece.

    Don’t get me wrong; I love the saxophone’s expansive palette of tone colors, and will happily flutter-tongue or play multiphonics or whatever. But it’s nice to play a melody once in a while.

  • Creating fingering charts with diagrams from the Fingering Diagram Builder

    My Fingering Diagram Builder has been around for a little over five years now. I was careful to name it the Fingering Diagram Builder instead of the Fingering Chart Builder because it is a tool for creating individual diagrams, not for assembling them into comprehensive fingering charts. But the difference can be a little confusing, so I get frequent questions from users who complain that they can’t figure out how to create and download a “chart” with multiple fingerings on it.

    The reason I didn’t try to build a complete system for creating fingering charts is that I assumed users would have widely-varying needs, and would do better to assemble charts using some other kind of software. Here are a few examples of how that might be done, using music notation software, using a word processor, and using a text editor to create HTML code (such as for a website). All the software I’m using here is free to download on Windows, Mac OS, and Linux, but whatever free or commercial programs you are already using probably have similar features. You’re on your own to work out the details (and feel free to share them in the comments if you are feeling helpful).

    Creating a fingering chart in music notation software

    I am using MuseScore here, but commercial software like Finale and Sibelius and other free software like LilyPond could be used in similar ways.

    First I set up a musical “score” with the notes for the chart. I used whole notes, separated by double bar lines, but that’s up to you.

    MuseScore setup

    Next I created my fingering diagrams in the FDB. I sized the diagrams “tiny” with “thick” lines.

    Adding the diagrams to the score is very simple in MuseScore—I just dragged the downloaded diagrams from my file manager right onto the score. If I drag the diagram and hover it on top of a note, that note gets highlighted. Then I can release the diagram and it attaches to the note.

    musescore-drop

    Initially the diagrams are placed right on top of the note. I selected the diagrams and used the Inspector panel to give them a horizontal offset of -2.5sp and a vertical offset of -10.5 sp, which moved them above the staff, more or less centered above the noteheads. I adjusted the A and tenor B-flat fingerings’ horizontal offsets a bit more to make them look just right.

    Here is the finished product, a small chart with a few bassoon fingerings:

    bassoon-fingering-chart-sample

    Creating a fingering chart in word processing software

    I am using LibreOffice Writer, but something like Microsoft Word or Apple Pages would work just as well.

    First I opened a new document and inserted a table. My table has three rows and seven columns.
    writer-table

    Then I dragged the downloaded diagrams from my file manager into the bottom row of the table.

    writer-diagrams

    I merged some cells together, dragged in some images of notes on staves, and added some text.

    writer-complete

    A few more little tweaks and here is the finished chart:

    clarinet-fingering-chart-sample

    Creating an HTML fingering chart in text editing software

    This code be used in any text editor or HTML source editor, and of course similar results could be accomplished with a visual/WYSIWYG editor. I’m not showing complete code here, just the most relevant parts.

    I started with a framework for a table that I could use to show a note with two alternate fingerings. (This is a flute fingering chart with horizontally-oriented diagrams. For an instrument with vertically-oriented diagrams, you may want to rearrange things a bit.)

    <table>
      <tr>
        <th rowspan=2><!— note image here —></th>
        <td><!— first fingering image here —></td>
        <td><!— first fingering text here —></td>
      </tr>
      <tr>
        <td><!— second fingering image here —></td>
        <td><!— second fingering text here —></td>
      </tr>
    </table>
    

    Then I plugged in <img> tags and text:

    <table>
      <tr>
        <th rowspan=2><img src="images/f-sharp-note.png" /></th>
        <td><img src="images/f-sharp-standard.png"</td>
        <td>Standard</td>
      </tr>
      <tr>
        <td><img src="images/f-sharp-trill.png"</td>
        <td>Trill from E</td>
      </tr>
    </table>

    I duplicated that code for additional notes. Since this is a sample alternate/trill fingering chart, each note has at least two fingerings. For notes with more fingerings, I added <tr>s and changed the rowspan values accordingly.

    I also added a little CSS to spruce things up:

    <style>
      table {
        display: inline-block; /* make tables wrap gracefully depending on screen width */
        margin: 1em; /* put some space between tables for legibility/clarity */
      }
      th img {
        max-width: 8em; /* manage size of note images */
      }
    </style>

    Here is the result:

    flute-fingering-chart-sample

    I hope that sparks a few ideas for you if you are considering putting together a fingering chart. If you have other methods or tips, please share in the comments section!

Leave a Reply

Your email address will not be published. Required fields are marked *

Comments that take a negative or confrontational tone are subject to email and name verification before being approved. In other words: no anonymous trolls allowed—take responsibility for your words.

This site uses Akismet to reduce spam. Learn how your comment data is processed.