Bad ideas woodwind doublers get

Some, but fortunately not all, of these are mistakes I have made myself.

Bad idea Good idea
“With the help of a fingering chart and the Internet, I can pick up clarinet on my own. I’ll take lessons later, once I’ve gotten pretty good.” “The earliest stages of learning are when the vital habits are formed. Now is the crucial time to get some expert guidance.”
“Someone is selling an oboe really cheap. This is my chance to pick one up.” “It will be worth it to save and sacrifice so I can get a high-quality instrument. Since I’m doubling, I need every advantage.”
“I just need to learn how to make a good embouchure and how to finger most of the notes, and then I can add this new instrument to my arsenal.” “I need a solid technical foundation on my doubling instruments, just like I have on my main instrument. Better start putting in some hours on long tones, scales and arpeggios, and etudes.”
“I play flute pretty well compared to the other guys in the saxophone section, so I figure I’m on the right track.” “I’m spending a lot of time listening to great flute recordings to develop a good sound concept.”
“I already have lots of etudes and exercises that I use on my main instrument, so I’ll just practice the same stuff on my other instruments.” “I’m immersing myself in the tradition of each instrument—learning, for example, to play saxophone like a saxophonist and clarinet like a clarinetist.”
“I sound bad. Maybe I need a really short barrel, a really soft reed, a really open mouthpiece, a really unusual headjoint…” “I’ll leave extreme gear choices for when I really know what I’m doing. For now I’d better stick to standard, middle-of-the-road equipment and get some embouchure advice from a good teacher.”
“Since I’m a jazz player, I can skip the tone exercises. I’m going for my own sound.” “Classical training will give me a thorough command of the instrument, and give me options in developing a personal sound concept. If I skimp on fundamentals, I’ll just be limiting what I can do.”
“I’ve got some money to spend. What new instrument can I get for this amount?” “This is a perfect opportunity to take some lessons with a good teacher. It’s the best investment I can make in my music habit.”

No shortcuts!

Similar Posts

  • Creating fingering charts with diagrams from the Fingering Diagram Builder

    My Fingering Diagram Builder has been around for a little over five years now. I was careful to name it the Fingering Diagram Builder instead of the Fingering Chart Builder because it is a tool for creating individual diagrams, not for assembling them into comprehensive fingering charts. But the difference can be a little confusing, so I get frequent questions from users who complain that they can’t figure out how to create and download a “chart” with multiple fingerings on it.

    The reason I didn’t try to build a complete system for creating fingering charts is that I assumed users would have widely-varying needs, and would do better to assemble charts using some other kind of software. Here are a few examples of how that might be done, using music notation software, using a word processor, and using a text editor to create HTML code (such as for a website). All the software I’m using here is free to download on Windows, Mac OS, and Linux, but whatever free or commercial programs you are already using probably have similar features. You’re on your own to work out the details (and feel free to share them in the comments if you are feeling helpful).

    Creating a fingering chart in music notation software

    I am using MuseScore here, but commercial software like Finale and Sibelius and other free software like LilyPond could be used in similar ways.

    First I set up a musical “score” with the notes for the chart. I used whole notes, separated by double bar lines, but that’s up to you.

    MuseScore setup

    Next I created my fingering diagrams in the FDB. I sized the diagrams “tiny” with “thick” lines.

    Adding the diagrams to the score is very simple in MuseScore—I just dragged the downloaded diagrams from my file manager right onto the score. If I drag the diagram and hover it on top of a note, that note gets highlighted. Then I can release the diagram and it attaches to the note.

    musescore-drop

    Initially the diagrams are placed right on top of the note. I selected the diagrams and used the Inspector panel to give them a horizontal offset of -2.5sp and a vertical offset of -10.5 sp, which moved them above the staff, more or less centered above the noteheads. I adjusted the A and tenor B-flat fingerings’ horizontal offsets a bit more to make them look just right.

    Here is the finished product, a small chart with a few bassoon fingerings:

    bassoon-fingering-chart-sample

    Creating a fingering chart in word processing software

    I am using LibreOffice Writer, but something like Microsoft Word or Apple Pages would work just as well.

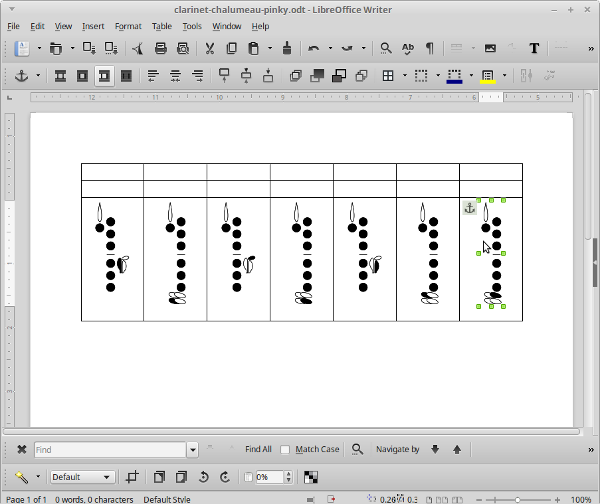
    First I opened a new document and inserted a table. My table has three rows and seven columns.
    writer-table

    Then I dragged the downloaded diagrams from my file manager into the bottom row of the table.

    writer-diagrams

    I merged some cells together, dragged in some images of notes on staves, and added some text.

    writer-complete

    A few more little tweaks and here is the finished chart:

    clarinet-fingering-chart-sample

    Creating an HTML fingering chart in text editing software

    This code be used in any text editor or HTML source editor, and of course similar results could be accomplished with a visual/WYSIWYG editor. I’m not showing complete code here, just the most relevant parts.

    I started with a framework for a table that I could use to show a note with two alternate fingerings. (This is a flute fingering chart with horizontally-oriented diagrams. For an instrument with vertically-oriented diagrams, you may want to rearrange things a bit.)

    <table>
      <tr>
        <th rowspan=2><!— note image here —></th>
        <td><!— first fingering image here —></td>
        <td><!— first fingering text here —></td>
      </tr>
      <tr>
        <td><!— second fingering image here —></td>
        <td><!— second fingering text here —></td>
      </tr>
    </table>
    

    Then I plugged in <img> tags and text:

    <table>
      <tr>
        <th rowspan=2><img src="images/f-sharp-note.png" /></th>
        <td><img src="images/f-sharp-standard.png"</td>
        <td>Standard</td>
      </tr>
      <tr>
        <td><img src="images/f-sharp-trill.png"</td>
        <td>Trill from E</td>
      </tr>
    </table>

    I duplicated that code for additional notes. Since this is a sample alternate/trill fingering chart, each note has at least two fingerings. For notes with more fingerings, I added <tr>s and changed the rowspan values accordingly.

    I also added a little CSS to spruce things up:

    <style>
      table {
        display: inline-block; /* make tables wrap gracefully depending on screen width */
        margin: 1em; /* put some space between tables for legibility/clarity */
      }
      th img {
        max-width: 8em; /* manage size of note images */
      }
    </style>

    Here is the result:

    flute-fingering-chart-sample

    I hope that sparks a few ideas for you if you are considering putting together a fingering chart. If you have other methods or tips, please share in the comments section!

  • Voicing: stable vs. flexible

    I have discussed here previously the importance of proper voicing for woodwind instruments. In a nutshell, voicing is the configuration of the oral cavity, manipulated by moving the back of the tongue.

    There seems to be some debate about voicing: is it something static, or something that changes from note to note? I find that the answer is, sort of, both.

    photo, stonelucifer
    photo, stonelucifer

    For beginning woodwind players, tone, intonation, and response (virtually every aspect of tone production) can be improved by habituating a single, stable, “correct” voicing. When this is accomplished, an ideal woodwind instrument, which of course does not exist, would play perfectly in tune, with perfectly consistent tone from note to note, and with perfectly even and reliable response.

    An instrument that is merely good will do these things well, but imperfectly. A more advanced musician can use small and temporary voicing adjustments to improve individual notes by altering their pitch, tone, or responsiveness. Doing this requires a “stable” voicing as a stepping-off point, fine control of the mechanics of voicing, and an ear trained to hear notes that are out of tune, uncharacteristic in tone, or problematic response-wise.

    So, in general, when working with beginning students or others with significant tone production issues, the goal is to work toward a stable voicing that stays the same from note to note, but with more advanced students the goal is to learn to adjust the voicing ever so slightly to improve each note as needed.

  • Achieving an ideal tone

    A lot of the questions people have about woodwind playing center on tone: how can I get a better tone? a darker tone? a tone like _____’s? There’s not a lot of clarity on this, for a few reasons:

    • Firstly, of course, “good” tone is subjective, and trying to communicate clearly about tone in more dispassionate terms is problematic due to inconsistent vocabulary.
    • Tone is made from a recipe of factors, so it’s hard to isolate individual ones. Will adding another egg improve your cake? Depends on what else is in it. Will a certain warm-up exercise or piece of equipment have a specific effect on your tone? Depends on what other equipment and playing techniques you are using.
    • Much of what affects tone is difficult or impossible to observe and measure.

    Let’s look at the physical factors that influence tone:

    • Yes, of course, equipment. It’s axiomatic in woodwind playing that your equipment does affect your tone, but not as much as you affect your tone. Still, your particular combination of headjoint, reed, mouthpiece, ligature, barrel, bocal, instrument, and various other parts and accessories does influence in some way the sound that you make. Equipment of good design and construction, and within typical parameters, will contribute to an essentially characteristic tone quality. (By characteristic I mean easily identifiable as a specific instrument by someone with a musically-educated ear.)
    • Basic woodwind-playing techniques, including most notably breath support, voicing, and embouchure. Assuming these are well-trained, they also contribute to a characteristic tone quality.
    • Some subtle aspects of those woodwind-playing techniques that are hard to pin down. These small things determine how the tone fits into the larger world of characteristic tone qualities, usually described poorly in vague terms like “good” or “pure” or “rich” or “buttery” or “vocal.” For example, an oboist’s embouchure puts different pressures on different parts of the reed. Those pressures can be adjusted very subtly using the small and flexible muscles of the embouchure, but most oboists probably aren’t very aware of exactly what adjustments they are making (though they may know what it feels like). Most are also not very capable of passing that wisdom (i.e. a feeling) along to a student or colleague. Some of them can be described in too-general terms (“bring the corners of your mouth in more”), or can be evoked with spotty accuracy through metaphor or through tone exercises.
    photo, Tom Page
    photo, Tom Page

    So, how do you ever develop a tone that is characteristic, personal, and beautiful?

    • Use appropriate equipment.
    • Employ solid fundamental woodwind-playing techniques.
    • Listen frequently, widely, and at length to good music, particularly on your instrument, to develop a tone concept—an aural impression of your ideal tone. In early stages, that might be based on how deeply you have absorbed the sound of a favorite musician, perhaps your teacher. In later stages, it might be a sort of composite of your favorite aspects of many tones that you have internalized, perhaps even things that inspired you about a performance on an instrument other than your own (or a voice). Ultimately, it might be a tone that you have never heard before, but which you can imagine.

    Here’s why tone concept is so crucial:

    All those subtleties of woodwind technique that affect tone, the ones that are so hard to understand and communicate? You can find them with patient and dedicated practice, if you know what you are listening for. As you have already discovered, your tone tends to change from day to day. This inconsistency can be a problem, but can also be a way of stumbling, even subconsciously, onto something positive. (When it’s a conscious process, your thought might be, “when I hold my embouchure this way, I get a sound that is more _____.”) Additionally, a clear tone concept may aid you in intuitively pursuing it; you already use the muscles of breathing, voicing, and embouchure to intuitively produce a huge and subtly-differentiated set of speech sounds, and for most of those you would be hard-pressed to explain how you make them. If you get comfortable and familiar enough with your instrument through years of practice, you can begin to tap into that intuitive control, but again: only if you know what sound you want to make.

    An ideal tone is a lifelong pursuit—invest in yours by listening and practicing daily.

  • Learning to play a woodwind: is previous woodwind experience a disadvantage?

    I teach a woodwind methods class as part of my graduate assistantship (and was the teaching assistant in the class for several years before teaching it on my own). In this class music education students get a crash course in playing and teaching the woodwind instruments, in preparation (too little!—but that’s another blog post) for careers as school band directors. My class is made up of woodwind players, brass players, percussionists, keyboardists, and even vocalists. It is interesting to see how to woodwind players fare in comparison to the non-woodwind players. Read More “Learning to play a woodwind: is previous woodwind experience a disadvantage?”

  • Doubling reminders for the day

    Non-doublers often seem to think that the most amazing thing about doubling is keeping all the fingerings straight. I don’t find that to be a major problem; the keywork of each instrument feels different enough in my hands that I think I tend to switch into the right fingering mode automatically.

    It’s the other stuff that’s a problem. I find I often need to give myself a few reminders as I’m setting down one instrument and picking up the next. Here’s the stuff that has been going through my mind lately—maybe one or more of these will click for you, too. Read More “Doubling reminders for the day”

  • Woodwind doubling on both oboe and bassoon

    Mid- to late-20th-century music written for woodwind doublers, such as musical theater “books,” largely solidified around three main types of doubling specialists. The most common of these is the clarinet/saxophone/flute player. Less common but still widely used are the oboist with passable single reed skills, and the “low reeds” bassoon/bass clarinet/baritone saxophone player.

    In the 21st century, “doubler” woodwind sections have shown a tendency to shrink in number of players while growing in number of instruments. That means that some new combinations of instrument are becoming common that weren’t before: for example, it would have been very unusual in the late 20th century to write both flute and oboe into the same book, but this is becoming much more commonplace.

    My sense is that woodwind doublers today are more willing/likely to embrace double reed playing, despite those instruments’ reputation (deserved or not) for being more difficult and their reputation (deserved) for being more expensive. But there seems to be some emerging conventional “wisdom” that oboe or bassoon is the way to go, and that playing both is inadvisable. I have to disagree.

    It seems unlikely to me that the trend of shrinking woodwind sections, with increasing demands on individual players, is going to reverse. I predict that within a decade or two we’ll see movement in major Broadway productions toward doublers playing oboe and bassoon in the same book.

    There’s another wrinkle to this: not all doublers are making their living in top-tier performance situations. It’s quite common for a small- to medium-sized university, or a large high school to hire one person to teach “double reeds.” Nearly always, this means hiring someone who is well-qualified on oboe or bassoon and relatively clueless on the other. I think oboists or bassoonists headed for doctoral degrees and university teaching would be well-advised to consider getting a minor, or at least some lessons, in the other double reed. (There may even be room for someone to develop a graduate program in “double reeds,” or perhaps at least the ability to tailor an existing multiple woodwinds degree to accommodate this.)

    Woodwind doublers already understand the benefits of being able to get the doubling gig, but also to get a broader array of single-instrument gigs. If you have the motivation to pursue both oboe and bassoon, I think you will find—as I have—more opportunities to make music.

One Comment

Leave a Reply

Your email address will not be published. Required fields are marked *

Comments that take a negative or confrontational tone are subject to email and name verification before being approved. In other words: no anonymous trolls allowed—take responsibility for your words.

This site uses Akismet to reduce spam. Learn how your comment data is processed.