A toolkit for simple woodwind repairs

I think it’s really valuable to be able to do a few small repairs on woodwind instruments. As a doubler, I’ve found it to be a financial necessity—I can’t afford to run to the repair shop every time some little thing needs tweaking on one of my instruments—and it’s a great way to get to know your instruments better. (I do still make sure my instruments visit a real professional on a regular basis.)

There are some inexpensive and easily-obtained tools that are useful to have around. Most of these things you can easily buy locally; only a few require buying from a musical instrument repair supplier (MusicMedic.com and Ferree’s Tools are a couple of good suppliers that happily sell to non-pros). These are tools and supplies suitable for small repairs and maintenance, the kinds of things that you can do mostly with common sense or with instructional materials available online. The most expensive item on my list is a “selection” of sheet cork, which I have pegged at about $20 to get smallish pieces in a few different thicknesses. You can get my entire list for less than the cost of a decent clarinet mouthpiece.


Click each item for a description.

simple repair tools
(see larger image)
rags cigarette papers cork sandpaper felt contact cement needle oiler lubricant paintbrushes shrink tubing screwdrivers pliers cigarette lighter spring hook cork grease plumbers tape razor blades tweezers

Click column headings to sort.

item useful for get it at appx. cost
Rags Cleaning, polishing, setting small screws on so they don’t roll away, touching hot instrument parts Home. Tear up an old shirt or bed sheet that has been washed many times $0
Cigarette papers, ungummed Soaking up moisture from toneholes, cutting into strips for makeshift feeler gauges A tobacco shop, or, for less offensive odor, a double reed supplier $1
Sheet cork, assorted thicknesses Replacing compressed or missing cork bumpers A musical instrument repair supplier $20
Wet-dry sandpaper, 400-grit Shaping cork and felt A hardware store $6
Dense felt, assorted thicknesses Replacing compressed or missing felt bumpers, quieting noisy keywork A musical instrument repair supplier, or maybe cut up an old felt hat; “craft” felts don’t work as well $2
Contact cement (jar with brush in lid) Adhering cork and felt to metal, lacquer, and wood A hardware store $4
Needle oiler Getting tiny drops of oil into hard-to-reach spaces A hardware store, hobby store, or musical instrument repair supplier $5
Automotive gear oil (or your own favorite key lubricant; I find many commercial “key oils” to be too runny) Lubricating and quieting keywork and other mechanisms An auto parts store $10
Small soft paintbrushes Gently removing dust and gunk from keywork without disassembly A drugstore or hobby store $1
Shrink tubing Replacing missing tubing on bridge mechanisms such as for saxophone octave keys and bassoon low E/whisper keys A musical instrument repair supplier or an electronics hobby store $2
Screwdrivers, assorted small standard, such as those found in a precision set Tightening and adjusting screws A hardware store. Give the leftover Phillips-head ones to a friend who wears eyeglasses $6
Small smooth-jawed needlenose pliers Gripping and bending, while minimizing damage to instrument finishes A hardware store $10
Cigarette lighter Softening shellac or glue to re-adhere loose pads, shrinking shrink tubing A drugstore $1
Crochet hook Putting errant springs back into place A drugstore or hobby store. If you like, file a groove into the non-hook end, so you have one end for pulling and one for pushing $1
Cork lubricant, solid and/or liquid Lubricating corks, quieting rollers A music store $3
Teflon “plumber’s” tape Holding together crumbling tenon corks, locking loose screws, filling space left by worn pivot screws A hardware store $1
Razor blades Cutting cork and felt. These require very sharp blades to cut neatly A drugstore $5
Tweezers Manipulating springs, screws, and various tiny parts A drugstore $1
Total About $80

Similar Posts

  • New Grove on flute materials

    The New Grove Dictionary of Music and Musicians is widely used by college music students and is regarded by most (for better or for worse) as the unimpeachable source of all musical knowledge. In my studies for upcoming doctoral comprehensive exams, I ran across this in the “Flute” article:

    Materials used for the tube and mechanism include nickel-silver, sterling silver, gold and platinum, while the springs are usually of tempered steel or phosphor bronze, occasionally of gold or another metal. The choice of material, especially for the head joint, influences the flute’s tone: wooden flutes produce a rich tone with a very full fortissimo in the lower register; metal flutes produce a limpid, flexible tone with great carrying power and also allow the player very sensitive control over the tone-colour; gold produces a mellow sound while silver is more brilliant. To achieve a combination of these qualities a head joint of wood or gold is sometimes fitted to a tube of silver.

    The idea of different materials having different sounds is, of course, seen as conventional wisdom by flutists (and indeed by wind players in general), but it flies in the face of 100 years of acoustical science. Read More “New Grove on flute materials”

  • Creating fingering charts with diagrams from the Fingering Diagram Builder

    My Fingering Diagram Builder has been around for a little over five years now. I was careful to name it the Fingering Diagram Builder instead of the Fingering Chart Builder because it is a tool for creating individual diagrams, not for assembling them into comprehensive fingering charts. But the difference can be a little confusing, so I get frequent questions from users who complain that they can’t figure out how to create and download a “chart” with multiple fingerings on it.

    The reason I didn’t try to build a complete system for creating fingering charts is that I assumed users would have widely-varying needs, and would do better to assemble charts using some other kind of software. Here are a few examples of how that might be done, using music notation software, using a word processor, and using a text editor to create HTML code (such as for a website). All the software I’m using here is free to download on Windows, Mac OS, and Linux, but whatever free or commercial programs you are already using probably have similar features. You’re on your own to work out the details (and feel free to share them in the comments if you are feeling helpful).

    Creating a fingering chart in music notation software

    I am using MuseScore here, but commercial software like Finale and Sibelius and other free software like LilyPond could be used in similar ways.

    First I set up a musical “score” with the notes for the chart. I used whole notes, separated by double bar lines, but that’s up to you.

    MuseScore setup

    Next I created my fingering diagrams in the FDB. I sized the diagrams “tiny” with “thick” lines.

    Adding the diagrams to the score is very simple in MuseScore—I just dragged the downloaded diagrams from my file manager right onto the score. If I drag the diagram and hover it on top of a note, that note gets highlighted. Then I can release the diagram and it attaches to the note.

    musescore-drop

    Initially the diagrams are placed right on top of the note. I selected the diagrams and used the Inspector panel to give them a horizontal offset of -2.5sp and a vertical offset of -10.5 sp, which moved them above the staff, more or less centered above the noteheads. I adjusted the A and tenor B-flat fingerings’ horizontal offsets a bit more to make them look just right.

    Here is the finished product, a small chart with a few bassoon fingerings:

    bassoon-fingering-chart-sample

    Creating a fingering chart in word processing software

    I am using LibreOffice Writer, but something like Microsoft Word or Apple Pages would work just as well.

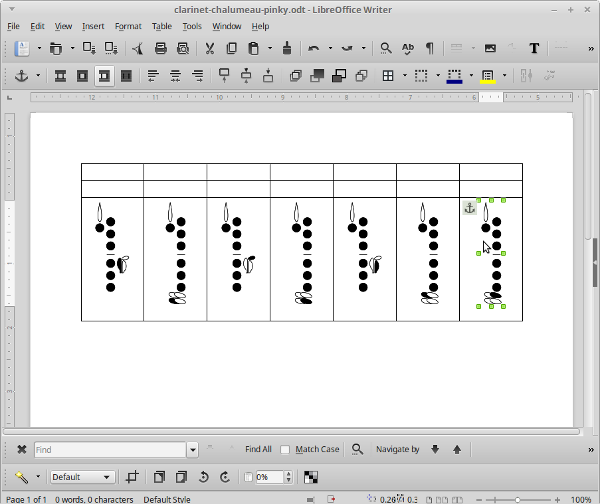
    First I opened a new document and inserted a table. My table has three rows and seven columns.
    writer-table

    Then I dragged the downloaded diagrams from my file manager into the bottom row of the table.

    writer-diagrams

    I merged some cells together, dragged in some images of notes on staves, and added some text.

    writer-complete

    A few more little tweaks and here is the finished chart:

    clarinet-fingering-chart-sample

    Creating an HTML fingering chart in text editing software

    This code be used in any text editor or HTML source editor, and of course similar results could be accomplished with a visual/WYSIWYG editor. I’m not showing complete code here, just the most relevant parts.

    I started with a framework for a table that I could use to show a note with two alternate fingerings. (This is a flute fingering chart with horizontally-oriented diagrams. For an instrument with vertically-oriented diagrams, you may want to rearrange things a bit.)

    <table>
      <tr>
        <th rowspan=2><!— note image here —></th>
        <td><!— first fingering image here —></td>
        <td><!— first fingering text here —></td>
      </tr>
      <tr>
        <td><!— second fingering image here —></td>
        <td><!— second fingering text here —></td>
      </tr>
    </table>
    

    Then I plugged in <img> tags and text:

    <table>
      <tr>
        <th rowspan=2><img src="images/f-sharp-note.png" /></th>
        <td><img src="images/f-sharp-standard.png"</td>
        <td>Standard</td>
      </tr>
      <tr>
        <td><img src="images/f-sharp-trill.png"</td>
        <td>Trill from E</td>
      </tr>
    </table>

    I duplicated that code for additional notes. Since this is a sample alternate/trill fingering chart, each note has at least two fingerings. For notes with more fingerings, I added <tr>s and changed the rowspan values accordingly.

    I also added a little CSS to spruce things up:

    <style>
      table {
        display: inline-block; /* make tables wrap gracefully depending on screen width */
        margin: 1em; /* put some space between tables for legibility/clarity */
      }
      th img {
        max-width: 8em; /* manage size of note images */
      }
    </style>

    Here is the result:

    flute-fingering-chart-sample

    I hope that sparks a few ideas for you if you are considering putting together a fingering chart. If you have other methods or tips, please share in the comments section!

  • The best _____ for woodwind doublers

    flute and clarinet
    Photo, Jope 1978

    What are the best instruments, mouthpieces, reeds, headjoints, method books, and other products for woodwind doublers?

    I often see this question asked on online message boards (“I’m a saxophone player, so which clarinet mouthpiece should I buy?”) or answered in advertising copy (“The perfect flute headjoint for the woodwind doubler”).

    When aspiring doublers ask this question, I think often what they are really asking is, “What product can I purchase that will save me having to really learn a new instrument?” If you’re serious about playing the flute, you’ll want to use the kind of flute that a good flutist would use. If you’re serious about the clarinet, you’ll seek out the kinds of reeds, mouthpieces, and instruments favored by fine clarinetists. In other words, the best clarinet for a woodwind doubler is… the best clarinet.

    To double successfully, you have to abandon the idea that you can double on flute and clarinet (and so forth) without having to commit to being a flutist and a clarinetist. There are no shortcuts!

  • Confidence and air

    Working with some woodwind students recently on their upcoming performances, I have been asking them to play with more confidence. Often they have practiced well enough, but play timidly in lessons or rehearsals, and I worry that the same will happen on stage.

    When I ask them to play more confidently, they don’t always seem ready to rise to the challenge. But I’ve worked out a useful equation that helps them get on the right track:

    confidence = air

    Confidence can seem difficult to muster, but air is free. When I point out the equivalence and ask them to just play with more air, they play better and discover the confidence they need.

    When you are playing and feel your confidence start to waver, don’t worry—you have a whole room full of confidence ready for you to breathe it in.

  • Sam Newsome on not doubling

    Sam Newsome asks the question, “Can You Double And Still Be A Great Soprano Saxophonist?”

    As I see it, if you play the soprano using a set-up that’s comparable to a much larger horn, you’re not dealing with the soprano on it’s own terms. It’s being treated as an extension of a much larger horn, and not as a separate entity.

    Go check it out.

  • Flexible EWI fingerings

    With traditional woodwind instruments, the fingers work together to change the effective length of the instrument’s body tube by opening and closing toneholes. Woodwind fingerings at their most basic use the fingers in sequence. For example, a certain note might be produced with an “open” fingering (all toneholes open). When the “first” finger (the one closest to the mouthpiece) closes a hole, the pitch drops, perhaps by a whole step. Adding the next farther finger drops the pitch again, and so on toward the bell end of the instrument.

    “Forked” fingerings, in which a lower tonehole is closed while one above it is open, often produce somewhat inferior results—notes that are mismatched in timbre and/or intonation. (Some modern woodwinds use special mechanisms to correct for this, such as the F resonance mechanism on a high-quality oboe.)

    An electronic woodwind-style instrument, such as the Akai EWI series, uses a fingering system that is designed to be similar to a traditional woodwind, so that a traditional woodwind player can easily adapt to it. But this is an arbitrary choice. Since the instrument’s tone production system uses electronic circuitry and software, rather than a vibrating air column, the fingering system don’t necessarily have to use the fingers in sequence, and forked fingerings don’t have any inherent problems. The fingerings can be invented completely from scratch, with no acoustical limitations.

    EWI fingerings are designed to draw upon the best of both worlds—the familiarity of traditional woodwind fingerings, and the flexibility of a non-acoustical fingering system.

    Note that the current-model EWI4000s, using version 2.4 of the operating system, includes several fingering modes. The mode I am considering here is the “EWI” mode, as the “flute,” “oboe,” and “saxophone” modes sacrifice some flexibility for the sake of increased familiarity to traditional woodwind players. You might consider this article to be subtitled, “Why you should be using the ‘EWI’ fingering mode.”

    The current manual (“revision D”) shows a mere 17 fingerings in its EWI mode fingering chart (11 chromatic pitches, with B-flat through D having fingerings in two octaves, and B-flat having one additional alternate fingering). But many, many more are possible.

    We can consider the individual EWI keys as having individual functions, rather than being inherently interdependent. For example, pressing none of the keys produces a C-sharp:

    C-sharp

    Adding any key will alter the C-sharp pitch by a given amount:

    key pitch change
    (in semitones)
    exceptions
    LH 1 -2
    LH bis -1 If both LH 1 and LH 2 are pressed, LH bis has no effect
    LH 2 -2 If LH 1 is not pressed, LH2 produces -1 (this makes LH middle finger C possible)
    LH 3 -2
    LH pinky 1 +1
    LH pinky 2 -1
    RH side +1 No effect when used in combination with LH pinky 1
    RH 1 -2 If LH 3 is not pressed, RH1 produces -1 (this makes 1 + 1 B-flat possible)
    RH 2 -1
    RH 3 -2
    RH pinky 1 +1
    RH pinky 2 -1
    RH pinky 3 -2

    If I press LH 1, LH 2, and LH 3, the pitch is lowered from C-sharp by a total of 6 semitones, producing the G fingering familiar to saxophonists, oboists, flutists, and clarinetists.

    But that is only one possible combination. I could also produce a G with, for example, LH 1, LH 2, and RH 3. Or LH 3, LH pinky 2, RH 1, and RH pinky 2. These fingerings would be extremely unlikely to work on a traditional woodwind, but with the EWI the possibilities are wide open. As long as the total pitch change adds up to -6 (and accounting for any of the listed exceptions), you get a G.

    Standard G fingering.(LH 1 + LH 2 + LH 3) = (-2 + -2 + -2) = -6 = G One alternative G fingering.(LH 1 + LH 2 + RH 3) = (-2 + -2 + -2) = -6 = G Another alternative G.(LH 3 + LH pinky 2 + RH 1 + RH pinky 2) = (-2 + -1 + -2 + -1) = -6 = G

    These examples are illustrative but likely have few real-world applications. For a more practical example, consider trills, which among traditional woodwind players are a subject of endless discussion and books upon books of awkward, complicated fingerings. An ideal trill fingering involves moving only one finger, preferably one that can be moved in a rapid, controlled, non-awkward way. Continue reading for a musical example and sound clip →

6 Comments

  1. Bret, I carry super glue GEL in my small tool/repair kit.
    This glue gives you a few seconds of working time and it sets quickly. Really strong bond for gluing corks, felts etc.
    WAY smaller than a contact cement jar!
    Greg Huckins

    1. Thanks for the tip! That would definitely be smaller, but do you find that it’s a problem if you need to remove the corks or felts later? I would be concerned about the super glue taking off saxophone lacquer, etc.

  2. Bret, in doing an emergency glue-on in a pit or off stage before a concert, IMO contact cement takes a bit too long.
    You need just a tiny amount of super glue gel to adhere the cork or felt back on- and it sets fairly quickly. I think some WW techs are using different types of cyanoacrylate adhesives for many things in the shop. And there are de-bonder solutions for removing it. Maybe a tech will join in on this thread-

  3. You should put some cardboard in there for making wedges and having something that can prop open keys or elevate mechs on the instruments.

  4. I like to keep pipe cleaner around for obvious reasons. When I have something trying to back out, I can clean it. If that’s not working, I know what the problem is.

Leave a Reply

Your email address will not be published. Required fields are marked *

Comments that take a negative or confrontational tone are subject to email and name verification before being approved. In other words: no anonymous trolls allowed—take responsibility for your words.

This site uses Akismet to reduce spam. Learn how your comment data is processed.