When there’s no place to breathe

When you’re working on a new piece and there’s no place to breathe:

  • Re-examine. Are you sure there’s no place? Tonal wind-instrument music usually has phrases. To find them might take some careful analysis, or maybe listening to a recording to check out someone else’s solutions. Once you know where the phrases end, you may be able to take a little extra time to breathe in those spots without it sounding disruptive.
  • Practice. With some effort and repetition, you may be able to play longer phrases than you thought. Make sure you’re really taking a full breath—the inhalation should feel pretty physical, much more so than “normal” (tidal) breathing.
  • Edit thoughtfully. If the music was written originally for, say, piano or a string instrument (or if it’s just written by a less-experienced wind composer), it may not have good built-in breaths. Where absolutely necessary, consider breaking a slur, reducing the dynamic level, boosting the tempo, or making some other minor adaptation. Mark it in, so you’re in the habit of breaking with the composer’s intent only after serious deliberation.
  • Be quick. Sometimes a very small, very short breath is all you need to finish out a phrase strong. Find a reasonable musical place to insert one, and mark it in such a way that you will remember not to take too much time for it.
  • Consider circular breathing. It’s a challenge but not impossible for someone playing at a reasonably advanced level. But be careful: don’t use it an excuse to avoid the issue of phrasing. Plus, it’s not very comfortable to circular-breathe for extended periods, for you or your audience. (Audiences often breathe with you!) Use this as a last resort or when specifically requested by the composer.

Similar Posts

  • Creating fingering charts with diagrams from the Fingering Diagram Builder

    My Fingering Diagram Builder has been around for a little over five years now. I was careful to name it the Fingering Diagram Builder instead of the Fingering Chart Builder because it is a tool for creating individual diagrams, not for assembling them into comprehensive fingering charts. But the difference can be a little confusing, so I get frequent questions from users who complain that they can’t figure out how to create and download a “chart” with multiple fingerings on it.

    The reason I didn’t try to build a complete system for creating fingering charts is that I assumed users would have widely-varying needs, and would do better to assemble charts using some other kind of software. Here are a few examples of how that might be done, using music notation software, using a word processor, and using a text editor to create HTML code (such as for a website). All the software I’m using here is free to download on Windows, Mac OS, and Linux, but whatever free or commercial programs you are already using probably have similar features. You’re on your own to work out the details (and feel free to share them in the comments if you are feeling helpful).

    Creating a fingering chart in music notation software

    I am using MuseScore here, but commercial software like Finale and Sibelius and other free software like LilyPond could be used in similar ways.

    First I set up a musical “score” with the notes for the chart. I used whole notes, separated by double bar lines, but that’s up to you.

    MuseScore setup

    Next I created my fingering diagrams in the FDB. I sized the diagrams “tiny” with “thick” lines.

    Adding the diagrams to the score is very simple in MuseScore—I just dragged the downloaded diagrams from my file manager right onto the score. If I drag the diagram and hover it on top of a note, that note gets highlighted. Then I can release the diagram and it attaches to the note.

    musescore-drop

    Initially the diagrams are placed right on top of the note. I selected the diagrams and used the Inspector panel to give them a horizontal offset of -2.5sp and a vertical offset of -10.5 sp, which moved them above the staff, more or less centered above the noteheads. I adjusted the A and tenor B-flat fingerings’ horizontal offsets a bit more to make them look just right.

    Here is the finished product, a small chart with a few bassoon fingerings:

    bassoon-fingering-chart-sample

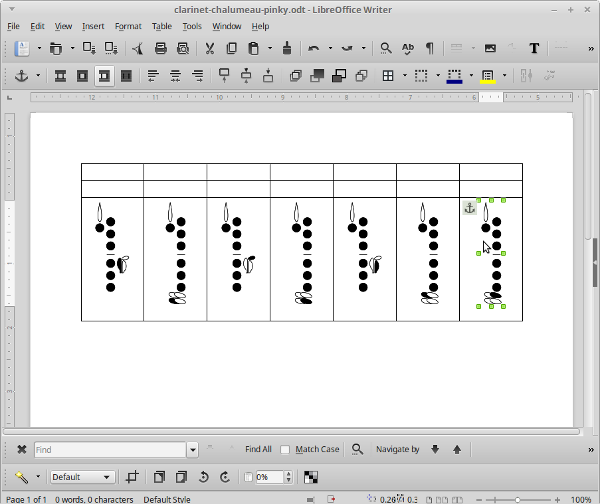
    Creating a fingering chart in word processing software

    I am using LibreOffice Writer, but something like Microsoft Word or Apple Pages would work just as well.

    First I opened a new document and inserted a table. My table has three rows and seven columns.
    writer-table

    Then I dragged the downloaded diagrams from my file manager into the bottom row of the table.

    writer-diagrams

    I merged some cells together, dragged in some images of notes on staves, and added some text.

    writer-complete

    A few more little tweaks and here is the finished chart:

    clarinet-fingering-chart-sample

    Creating an HTML fingering chart in text editing software

    This code be used in any text editor or HTML source editor, and of course similar results could be accomplished with a visual/WYSIWYG editor. I’m not showing complete code here, just the most relevant parts.

    I started with a framework for a table that I could use to show a note with two alternate fingerings. (This is a flute fingering chart with horizontally-oriented diagrams. For an instrument with vertically-oriented diagrams, you may want to rearrange things a bit.)

    <table>
      <tr>
        <th rowspan=2><!— note image here —></th>
        <td><!— first fingering image here —></td>
        <td><!— first fingering text here —></td>
      </tr>
      <tr>
        <td><!— second fingering image here —></td>
        <td><!— second fingering text here —></td>
      </tr>
    </table>
    

    Then I plugged in <img> tags and text:

    <table>
      <tr>
        <th rowspan=2><img src="images/f-sharp-note.png" /></th>
        <td><img src="images/f-sharp-standard.png"</td>
        <td>Standard</td>
      </tr>
      <tr>
        <td><img src="images/f-sharp-trill.png"</td>
        <td>Trill from E</td>
      </tr>
    </table>

    I duplicated that code for additional notes. Since this is a sample alternate/trill fingering chart, each note has at least two fingerings. For notes with more fingerings, I added <tr>s and changed the rowspan values accordingly.

    I also added a little CSS to spruce things up:

    <style>
      table {
        display: inline-block; /* make tables wrap gracefully depending on screen width */
        margin: 1em; /* put some space between tables for legibility/clarity */
      }
      th img {
        max-width: 8em; /* manage size of note images */
      }
    </style>

    Here is the result:

    flute-fingering-chart-sample

    I hope that sparks a few ideas for you if you are considering putting together a fingering chart. If you have other methods or tips, please share in the comments section!

  • Out-of-tune accents

    Young woodwind players often have trouble playing elegant, well-controlled accents. Accented notes are too often thumpy and out of tune. The most common manifestations are accented notes that are too flat, or that scoop up to pitch.

    This is usually a side effect of the mistaken idea that accented notes should be tongued “harder.” The underlying misconception here is that the tongue “strikes” the reed in some way to kickstart its vibration. But the tongue merely releases the air that does the real work of starting the note, and releasing the air… harder?… doesn’t make a lot of sense.

    In a misguided attempt to tongue harder, less-experienced players end up moving more of the tongue than is necessary. In good woodwind playing, the tongue serves at least two separate functions: the tip of the tongue releases the reed/air for articulation effects, and the back of the tongue controls the space in the oral cavity for voicing. Tonguing “harder” often involves the back of the tongue in the articulation process, which means the voicing changes, and thus the pitch changes.

    Solve this problem by teaching a correct conception of articulation. Treat accents as note shapes, a dynamic effect.

  • Five little things that will make a difference in your next performance, audition, or competition

    When I listen to young and advancing woodwind players at the high school level (masterclass participants, scholarship or honor band auditionees, competition participants), I often think that there are some small fixes that would make a big difference in their success. There’s no substitute for lessons with a qualified teacher, but these improvements are easy and set you apart from the rest:

    • Slow down a little. Speed is only impressive if your playing is clean, even, and precise. If taking a slightly slower tempo gives you better accuracy and control, do it.
    • Breathe intentionally. Where you breathe in the music makes a huge difference in your phrasing. Never just play until you run out of air. Find places to breathe that sound natural. If you’re not sure, listen to a recording of a good player and copy their breaths, or record yourself and notice what sounds right or wrong. Mark the breaths in (all of them!) and practice them carefully until they are a habit.
    • Do bigger dynamics. Even if you think you are already following the dynamic markings, make your softs softer and your louds louder.
    • Choose reeds wisely. I hear lots of ambitious young players using reeds that are much too hard. If a little softer reed allows you to play with ease and comfort, you will probably sound better. And a performance isn’t the time to use a brand-new one, or one that is past its prime. A week or two ahead, break in some new reeds and pick the best 2-3 to have on hand.
    • Relax. Tension is the biggest thing that tanks even well-prepared performances. Practice releasing the tension in your body. As you feel tension creep back in, release it again. Take advantage of rests or other pauses in the music to release once more. Try a pre-performance ritual like box breathing to reduce your adrenaline response, focus and calm your mind, and steady your hands.

    Sometimes the smallest adjustments make the biggest difference. If you are an advancing player, which of these do you think would help you the most? If you’re a teacher, what small fixes do you recommend most?

  • Should I buy something new?

    Changing your instrument, mouthpiece, headjoint, reeds, etc. on a frequent basis isn’t productive, but sticking with the same equipment forever isn’t a virtue either. Here are some questions to ask yourself (or a trusted teacher or colleague) when you start feeling the itch to spend money on shiny new things:

    • Does this new equipment make it easier or more comfortable to do what I do? Or am I hoping it will magically endow me with abilities I didn’t have before?
    • Does this materially improve some concrete aspect of my playing, like intonation, response, dynamic range or finger movement? Is it an improvement that is more subjective, fleeting, or malleable, like tone quality? (Tone quality isn’t nothing when purchasing woodwind gear, but it’s not everything, either.)
    • Does this really change how I sound? Does it change how it feels to play, physically? Does it change how it feels to play, emotionally? (All of these can be valid reasons to change, but it’s worth sorting out what’s really changing.)
    • Is this new equipment appealing in some way that is more about appearance or cachet than playability? Is that worth the investment to me? Would I be sacrificing some playability for bling factor?
    • How did I come to desire this particular item? Was I influenced by advertising, celebrity endorsements, a commissioned salesperson, an internet stranger, or someone/something else that might have motivations separate from my success? Was I happy with my current setup before I learned of this product’s existence?

    If you’re currently a student, be sure to check in with your teacher before any new gear purchase!

  • Should I buy a “step-up” instrument?

    Should you buy a “step-up” or “intermediate model” woodwind instrument? In most cases, I think the answer is no.

    For flute, oboe, clarinet, bassoon, or saxophone, I think the wisest course, if you can afford it, is usually to start with a high-quality, best-in-class student-model instrument. The advantages of this are:

    • Lower price range (though maybe in the upper part of that range)
    • High-quality student instruments are easier to play than low-quality ones, giving beginners an advantage and a positive experience
    • Quality student instruments can, in some cases, be used all the way through high school band
    • Quality student instruments retain their value better, so you may be able to recoup some of your investment if the instrument falls into disuse or you replace it with a more advanced model

    At some point, the option may be suggested, by an educator or a salesperson, to “step up” to an intermediate model. My experience with these is generally:

    • The price range is not much lower than professional-quality instruments
    • The quality not much better than good student instruments
    • Sometimes they have some cosmetic differences that make them seem more “professional” or luxurious but which do not give any real advantage to the player

    So, in most cases my advice is to skip the step-up instrument. Instead consider investing in some private lessons with a good teacher. These will bring much greater benefits.

    And if you intend to audition for college scholarships, participate in competitions, or otherwise play at a high level, the private teacher is a crucial resource when you are ready to buy a professional model. These are instruments suitable for the demands of college music programs and at least semi-professional playing situations. Because they are expensive, it’s worth choosing one very carefully, and a good teacher can help you figure out what you need, connect with a reputable dealer, and get the best price.

  • ClarinetFest 2014 presentation: The 21st-century woodwind doubler

    I gave a presentation at the International Clarinet Association conference (“ClarinetFest”) last week on woodwind doubling, with a particular focus on the rising expectations on woodwind doublers to play more instruments at a higher level (including “world” and even electronic woodwinds). Here is the blurb from the program:

    The typical working woodwind doubler in the 20th century was a strong player on one or two instruments, with a lesser level of achievement on one or two more. Woodwind doubling continues to be a marketable skill in live performance and studio work, but the expectations of woodwind doublers have changed with the music industry; 21st century “doublers” may be expected to play a much larger group of instruments (sometimes including “world” woodwinds and electronic instruments), and to play each of those at a more virtuosic level and in a variety of styles. This places increasingly high demands on woodwind players, but also offers a variety of rewards. This presentation profiles the modern woodwind doubler, and includes practical information for developing valuable doubling skills.

    Here is the handout: The 21st century woodwind doubler

    Victor Chavez from the University of Tennessee at Knoxville did a brief write-up on the ClarinetFest blog.

    The crowd, as usual, was small but enthusiastic. I got to reconnect with some old doubler friends and meet some new ones. I was gratified to have many of them mention that they follow this blog (hello!) or make use of other resources on this site.

    I understand there are several doubling-related events going on at the International Double Reed Society conference this week, as well!

Leave a Reply

Your email address will not be published. Required fields are marked *

Comments that take a negative or confrontational tone are subject to email and name verification before being approved. In other words: no anonymous trolls allowed—take responsibility for your words.

This site uses Akismet to reduce spam. Learn how your comment data is processed.